
OPERATOR'S MANUAL
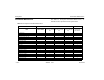
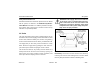
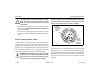
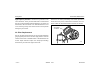
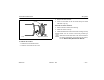
Table Of Contents
- How to Use This Manual
- Safety Signals
- Vehicle Safety
- How to Find What You Want
- A Special Word About Repairs
- Shop Manuals
- Preventive Maintenance Section
- Additional Sources of Information
- Start–Up
- Instruments and Controls
- Introduction
- Warning Lights and Buzzer
- Self Test
- Speedometer and Odometer
- Tachometer
- Coolant (Water) Temperature Gauge
- Engine Oil Pressure Gauge
- Dual Air Pressure Gauge (Air Reservoir)
- Fuel Gauge
- Voltmeter (option)
- Transmission Temperature Gauge (option)
- Air Filter Restriction Indicator (option)
- Headlight Switch
- Daytime Running Lights (option)
- Panel Lights
- ID and Clearance Lights
- Windshield Wipers/Washer
- Ignition Key Switch
- Parking Brake
- Cruise Control Switch
- Hand Throttle Control
- Heating and Air Conditioning
- Accessories
- Seats
- Steering Column and Mirrors
- Operating the Engine
- Operating the Transmission
- Using the Brake System
- Operating the Rear/Drive Axle
- More Driving Tips and Techniques
- Vehicle Recovery and Spring Brakes
- Shut–Down
- Introduction
- Maintenance Schedule and Lubrication
- Engine Maintenance
- Cooling System
- Brake System
- Air System
- Tires and Wheels
- Heater and Air Conditioner
- Electrical System
- Cab Maintenance
- Transmission and Clutch
- Steering and Driveline
- Front Axle and Suspension
- Rear Axle and Suspension
- Frame and Fifth Wheel
- Noise and Emission Control
- Consumer Information and Vehicle Identification

Air System Preventive Maintenance
– 168 –
PB1318 3/01 Model 330
According to Table 11, “Air System Scheduled Maintenance,”
Page 164:
• Inspect compressor air filter element, if so equipped, and
replace element if clogged. Check compressor mounting
and drive for alignment and belt tension. Adjust if neces-
sary.
• Remove compressor discharge valve cap nuts and
check for presence of excessive carbon. If excessive car-
bon is found, clean or replace the compressor cylinder
head. Also, check compressor discharge line for carbon,
and clean or replace the discharge line if necessary.
• Disassemble compressor and thoroughly clean and
inspect all parts. Repair or replace all worn or damaged
parts, or replace compressor with a factory exchange
unit.
CAUTION: When draining the engine cooling
system is required, to prevent damage from
freezing, the compressor must also be drained
at the cylinder head and block. Engine damage
could occur if the cooling system is not periodi-
cally drained and maintained. See “Cooling Sys-
tem,” Page 145, and the Medium Duty
Maintenance Manual for further information.
Air Dryer
NOTE:
A small amount of oil in the system may be
normal and should not, by itself, be considered
reason to replace a desiccant cartridge; oil-stained
desiccant can function adequately.
Every 900 operating hours or 25,000 miles/40,000 km or 3
months, check for moisture in the air brake system by open-
ing reservoirs, drain cocks, or valves and checking for the
presence of water. A tablespoon of water in a reservoir would
point to the need for a desiccant cartridge change. However,
the following should be considered first:
• Air usage is exceptionally high/abnormal for a highway
vehicle. This may be due to accessory air demands or
some other unusual air requirement that doesn’t allow
the compressor to load/unload in a normal fashion or it
may be due to excessive leaks in the air system.
• When more than a 30-degree F. (17-degree C) range of
temperature occurs in one day, small amounts of water
can accumulate in the air brake system due to conden-
sation. Under these conditions, the presence of small