
OPERATOR'S MANUAL

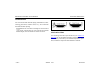


Table Of Contents
- How to Use This Manual
- Safety Signals
- Vehicle Safety
- How to Find What You Want
- A Special Word About Repairs
- Shop Manuals
- Preventive Maintenance Section
- Additional Sources of Information
- Start–Up
- Instruments and Controls
- Introduction
- Warning Lights and Buzzer
- Self Test
- Speedometer and Odometer
- Tachometer
- Coolant (Water) Temperature Gauge
- Engine Oil Pressure Gauge
- Dual Air Pressure Gauge (Air Reservoir)
- Fuel Gauge
- Voltmeter (option)
- Transmission Temperature Gauge (option)
- Air Filter Restriction Indicator (option)
- Headlight Switch
- Daytime Running Lights (option)
- Panel Lights
- ID and Clearance Lights
- Windshield Wipers/Washer
- Ignition Key Switch
- Parking Brake
- Cruise Control Switch
- Hand Throttle Control
- Heating and Air Conditioning
- Accessories
- Seats
- Steering Column and Mirrors
- Operating the Engine
- Operating the Transmission
- Using the Brake System
- Operating the Rear/Drive Axle
- More Driving Tips and Techniques
- Vehicle Recovery and Spring Brakes
- Shut–Down
- Introduction
- Maintenance Schedule and Lubrication
- Engine Maintenance
- Cooling System
- Brake System
- Air System
- Tires and Wheels
- Heater and Air Conditioner
- Electrical System
- Cab Maintenance
- Transmission and Clutch
- Steering and Driveline
- Front Axle and Suspension
- Rear Axle and Suspension
- Frame and Fifth Wheel
- Noise and Emission Control
- Consumer Information and Vehicle Identification

Engine Maintenance Preventive Maintenance
– 142 –
PB1318 3/01 Model 330
Accessory Drive Belts
You can extend the reliability and service life of your vehicle’s
drive belts with proper attention to installation, adjustment,
and maintenance. Neglect could cause belt failure. The result
could be the loss of the electrical or air system as well as
possible engine damage from overheating. So, it is a good
idea to check the belts frequently and replace them as soon
as you detect trouble.
Belt Installation
Follow these instructions to install an accessory drive
belt:
1. Loosen the pulley bracket(s) and shorten the distance
between the pulley centers. Install the new belt without
forcing it. Do not roll or pry the belt over the pulley.
2. Check the pulley alignment and adjustment if necessary.
Pulley misalignment must not be more than 1/16 in. (1.5
mm) for each 12 in. (300 mm) of belt free span. Belt free
span is measured between pulley centers.
3. Check the riding depth. Belt riding depth should not vary
more than 1/16 in. (1.5 mm) on matched belt sets.
4. Check that the belt does not ride on the bottom of the
pulley groove, and that the outside edge of the belt does
not stick out more than 1/16 in. (1.5 mm) beyond the out-
side edge of the pulley.
For details on adjusting belt tension see the
Engine Opera-
tion and Maintenance Manual included with your
Model 330
.
Belt Tension
Alternator drive belts (all widths), new or used, should be
adjusted to 120–140 pounds of tension. The best method of
testing belt tension is to apply a good quality commercial
gauge. If a tension gauge is not available, use this method of
testing:
• Apply force midway between the pulleys.
• Deflection should be one belt thickness for each foot dis-
tance between the pulley centers.