
OPERATOR'S MANUAL
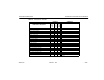


Table Of Contents
- How to Use This Manual
- Safety Signals
- Vehicle Safety
- How to Find What You Want
- A Special Word About Repairs
- Shop Manuals
- Preventive Maintenance Section
- Additional Sources of Information
- Start–Up
- Instruments and Controls
- Introduction
- Warning Lights and Buzzer
- Self Test
- Speedometer and Odometer
- Tachometer
- Coolant (Water) Temperature Gauge
- Engine Oil Pressure Gauge
- Dual Air Pressure Gauge (Air Reservoir)
- Fuel Gauge
- Voltmeter (option)
- Transmission Temperature Gauge (option)
- Air Filter Restriction Indicator (option)
- Headlight Switch
- Daytime Running Lights (option)
- Panel Lights
- ID and Clearance Lights
- Windshield Wipers/Washer
- Ignition Key Switch
- Parking Brake
- Cruise Control Switch
- Hand Throttle Control
- Heating and Air Conditioning
- Accessories
- Seats
- Steering Column and Mirrors
- Operating the Engine
- Operating the Transmission
- Using the Brake System
- Operating the Rear/Drive Axle
- More Driving Tips and Techniques
- Vehicle Recovery and Spring Brakes
- Shut–Down
- Introduction
- Maintenance Schedule and Lubrication
- Engine Maintenance
- Cooling System
- Brake System
- Air System
- Tires and Wheels
- Heater and Air Conditioner
- Electrical System
- Cab Maintenance
- Transmission and Clutch
- Steering and Driveline
- Front Axle and Suspension
- Rear Axle and Suspension
- Frame and Fifth Wheel
- Noise and Emission Control
- Consumer Information and Vehicle Identification

Engine Maintenance Preventive Maintenance
– 140 –
PB1318 3/01 Model 330
• Reinsert the dipstick all the way in and pull it out again to
check oil level. Correct oil level is between the low (L)
and high (H) marks on the dipstick.
For further information regarding oil level, see the engine
manufacturer's
Engine Operation and Maintenance Manual
supplied with the vehicle.
Fuel System
Specification: Use only Diesel Fuel, Grade 2-D, as recom-
mended by engine manufacturers. If you need further infor-
mation on Grade 2-D fuel specifications, consult the Engine
Operation Manual in the glove compartment.
WARNING! Diesel fuel in the presence of an igni-
tion source (such as a cigarette) could cause an
explosion. You could be seriously injured. A
mixture of gasoline or alcohol with diesel fuel
increases this risk of explosion.
CAUTION: If anyone ever pours gasoline into
your fuel tank, drain the entire system. Other-
wise, the pump and engine will be damaged.
Don’t try to dilute the gasoline by adding diesel
fuel (see Warning above).
Please follow these recommendations when you are chang-
ing your fuel filters or strainer elements. Your vehicle's engine
will run better and last longer if you do. See the engine man-
ufacturer's recommendations for proper water and micron
requirements.
Installing Fuel Filters
When removing filters, cover any electrical equipment and
wiring that might get soaked with fuel. Diesel fuel may per-
manently damage electrical insulation.
When installing spin–on (throwaway) filters:
1. Prefill filter with fuel.
2. Moisten gasket with diesel fuel.
3. Hand tighten them only 1/2 to 2/3 turn after gasket con-
tact. Mechanical tightening of these filters may distort or
crack the filter head.
• When replacing a fuel filter element, do not use a substi-
tute. Install only filter elements designed for fuel filtration.
First clean and inspect the shell. Then insert the new
element and fill the container at least 2/3 full of clean fuel
before installing the shell