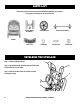
For The ON-THE-GO Pet™ INSTRUCTION MANUAL SPECIAL EDITION NO-ZIP PET STROLLER PG8250NZ Interior Dimensions: 25.5"L x 12"W x 20.5"H To see our full line of products, visit us online at: www.petgearinc.com CUSTOMER SERVICE HELP DESK customerservice@petgearinc.
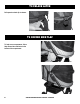
PARTS LIST Check that you have all the parts shown BEFORE assembling your product. If any parts are missing, call Customer Service. 2-Front Wheel Assembly 2-Rear Wheels Back Tray 2-Washers Rear Axle Assembly Stroller 2-Cotter Pins 2-Hub Caps UNFOLDING THE STROLLER Step 1. Release folding latch (A). tep 2. Spread handle (B) and seat apart until the frame S clicks and locks on both sides. Step 3. Ensure that the stroller is locked in on both sides before using.
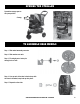
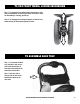
OPENING THE STROLLER Spread the canopy apart to the open position. Canopy TO ASSEMBLE REAR WHEELS Step 1. Slide wheel assembly onto axle. Step 2. Slide washer onto axle. Step 3. Fit straight part of cotter pin through hole on axle. Step 4. Line up each of the tabs in the hub cap with the slots in the wheel, snap hub cap into place. Step 5. Repeat for other side.
TO ASSEMBLE REAR AXLE TO FRAME Step 1. Turn stroller over. Step 2. Position rear axle assembly as shown. Step 3. Push rear axle onto frame until it clicks and locks into place on both sides. NOTE: Pull down firmly on the brackets to be sure they are securely attached to the stroller’s rear legs. TO ASSEMBLE FRONT WHEELS Step 1. Place front wheels unit on leg with locking lever pointing downward. Step 2. Press locking lever and slide swivel housing onto front leg. Step 3. Release locking lever.
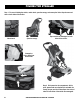
TO SECURE COMPARTMENT TO FRAME Step 1. Open stroller and pull compartment down. Step 2. Clip onto frame. TO SECURE LATCH Step 1. To close compartment, pull downward to latch clip onto frame. Step 2. Lift up on latch clip and secure by pushing down until it locks.
TO UNLOCK LATCH Pull upward on latch clip to release. TO SECURE SIDE FLAP To help secure compartment, Velcro flaps around tube and fasten to the bottom of the compartment.
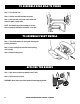
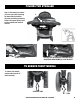
TO USE FRONT WHEEL LOCKING MECHANISM Step 1. To engage the front wheel locking mechanism so that the front wheel does not swivel, (best when the stroller is used for fast walking or running), pull tab up. Step 2. To disengage the locking mechanism so that the front wheel swivels (for easy steering) push tab down. Unlock Lock TO ASSEMBLE BACK TRAY Step 1. To assemble the back tray, first align a hole on one side of the tray with one of the bolts on the handle of the same side of the stroller. Step 2.
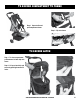
FOLDING THE STROLLER Step 1. For ease in folding the stroller, unlock latch, open the canopy, and unwrap the Velcro flaps from around tube on both sides of the stroller. Unlock latch. Open the canopy. Flaps need to be unwrapped on both sides of the stroller. Unwrap the Velcro flaps from around tube. Step 3. Pull upward on the compartment. At this point, please make sure that latch is unlocked, the canopy is open, and the 2 Velcro flaps from around tubes on both sides of the stroller are unwrapped.
FOLDING THE STROLLER Step 4. Slide frame lock release (C) to the right, while squeezing the main frame lock release (D) rotate the folding mechanism almost 180 degrees forward until stroller releases and handle is lowered. C. SLIDE TO RIGHT C. D. SLIDE TO RIGHT AND ROTATE 180 DEGREES FORWARD WHILE SQUEEZING MAIN FRAME (D) LOCK RELEASE TO REMOVE FRONT WHEELS To remove front wheels, squeeze tabs and pull off wheel assembly.
LOOKING AFTER YOUR STROLLER • • • • • Always store product in a clean, dry place. Not recommended for use on the beach. Do not put heavy items on top of the stroller. Clean frame by wiping with a lightly oiled cloth. Do not use detergent or abrasives. Spot clean fabric with dry cleaning fluid or mild soap and warm water. • To ensure easy maneuverability and to minimize wear and tear, (especially wheels, axles, and swivels), keep all moving parts clean and lubricated with WD40® or light machine oil.
WARNING! FOR PETS ONLY. Not intended to be used as a restraining device for aggressive or dangerous animals that dig, chew or paw aggressively. Do not leave your pet unattended. PET GEAR is not liable for any damage caused by aggressive, destructive, immature or untrained animals. Do not use near an open or exposed flame. Failure to follow these warnings and the instructions could result in serious injury or death.