Permasteel 80QT Cooler Use & Care Guide Model number: PS-208 Thank you for purchasing your new patio cooler from Permasteel. We hope you enjoy your product. If you have any questions, please call us 1-888-287-0735 or visit www.permasteel.
Table of content Important Information Important Information 2 Parts List 3 Thank you for your purchase of our Patio Cooler. We sincerely hope you will enjoy using our fine products. Hardware 4 • Assembly Steps 5 Please take time to read these instructions thoroughly and follow each step carefully for safe and easy operation. Care & Maintenance 10 • Please contact our customer service at 1-888-287-0735 if you have any questions.
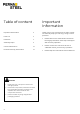
Parts List Key Description Qty A Lid Knob 2 B Lid 1 C Body Handle 2 D Body (Basin) 1 E Bottle Opener 1 F Bottle Cap Catcher 1 G Leg 4 H Supporting Rack 1 I Caster 2 J Caster with Brake 2 AA M6 x 16 Hex Flange Bolt 8 BB M5 x 35 Screw 2 CC M5 Washer 2 If you are missing any parts or have damaged parts, please call 1-888-287-0735 M-F 8:00-5:00 Pacific Time. For replacement, visit us at www.permasteel.
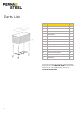
Hardware The following hardware is provided in a poly bag.
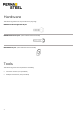
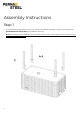
Assembly Instructions Step 1 • Turn body (basin) upside down, place it on a clean, soft surface and attach 4 legs (G) to body (D) with (8) M6x16mm hex flange bolts (AA), 2 bolts for each leg. Note: Do not fully tighten the bolts. Legs should be loose so that it can be aligned with the holes on the supporting rack and casters..
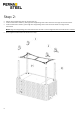
Step 2: • • • Attach the supporting rack (H) to the legs (G). Insert and thread casters (I) through the supporting rack holes and into two legs on the same side. Insert and thread casters (J) through the supporting rack holes and into other two legs on the same side Note: Legs and supporting rack should be loose so that it can be aligned with the holes for the casters • 6 Now, tighten all the bolts left loose from step 1.
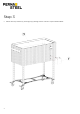
Step 3 • 7 Attach the cap catcher (F) to body (D) by sliding it down over the 2 pre-installed bolts.
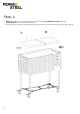
Step 4 • • 8 Note: The lid knobs (A) are pre-attached to the lid (B) with (2) M5x35mm screws (BB) and (2) M5 washers (CC). They are upside down. Please remove the knobs using a Phillips screwdriver and re-assemble them on the lid right-side up.
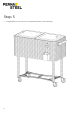
Step 5 • 9 Congratulations! You have now completed the patio cooler assembly.
Care & Maintenance Manufacturer recommends the following care & maintenance: • Cooler must be drained of water and completely dried in and out with a soft-clean cloth after every use. • When cooler is not in use for prolonged periods, it is recommended to store it in an enclosed dry place such as a storage shed or garage. • During the season when cooler is frequently used, it is recommended to use a weather-proof cover to cover when not in use.
We hope you enjoy your product and we are always here for you: Visit us at: www.permasteel.life Customer Service: 1-888-287-0735 Email: service@permasteel.life Distributed by Permasteel Inc.