
Installation Instructions


PERLICK RESIDENTIAL RS-CDK INSTALLATION INSTRUCTIONS
6 | perlick.com/residential
INSTALLATION
INSTALLATION OF DISPENSING EQUIPMENT
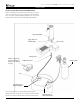
Openthetappingkitboxandbecomefamiliarwithits
components.Ifthedispensingheadisgoingtobemountedon
acountertopdirectlyabovetherefrigeratedcabinet,havethe
countertoppre-drilledusingthesuppliedtemplateonpage12.
Makesurethattheaccessholeintherefrigeratedcabinetisin
linewiththecountertopholes.Removeanyobstruconsfrom
theaccessholeoftherefrigerator.
Followinstruconsonpages8through11toproperlyinstallthe
tappingequipmentonyourPerlickunit,orwatchourBeer
DispenserTappingInstallaonvideo.
NOTE: Wash tapping devices thoroughly. Flush beer
and faucet lines, as well as the tapping device (keg
coupler) with fresh water.
IF YOU ARE INSTALLING A DRAFT ARM - SKIP TO PAGE 8. THE FOLLOWING INSTRUCTIONS ARE
ADDITIONAL PREPARATION STEPS FOR THE ADARA DISPENSING HEAD ONLY
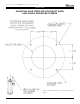
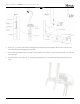
1. Marktheairtubeforcorrectlengthdependentuponyourinstallaonscenario.Ifinstallingdirectlyontopoftherefrigerated
cabinet,makeamark5inchesfromtheboomofthetower(Figure1).Ifinstallingdirectlyontopofacountertop,addthe
depthofthecountertoptotheoriginal5inchesandmarkatthatnewdimension(Figure2).
Figure 1. Figure 2.