
Installation Sheet


PERLICK RESIDENTIAL INSTALLATION MANUAL
12
perlick.com
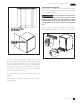
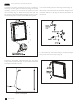
WOOD OVERLAY INSTALLATION
(FOR -2, -4 AND -6 MODELS)
Before beginning installation, check all components for
proper t and nish.
For best performance and
functionality, the overlay panels
should be 3/4” thick. The weight of the overlays should
not exceed 20 lbs for solid (-2) doors, 10 lbs for glass
(-4) doors, or 10 lbs for drawer (-6) models.
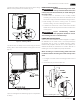
1. With the unit secured in position, open the door, remove
the door gasket and make sure panel pre-drilled holes
align with door frame holes.
2. Loosely attach four corners of overlay panel to the door
using #10 x 3/4” wood screws, installed through the
door frame from the rear.
3. Check for overall wood overlay panel t, position, and
function. Make minor adjustments as necessary. When
panel is properly aligned, tighten mounting screws
securely. Install the rest of the mounting screws and
tighten securely.
Do not overtighten wood overlay
attachment screws, as this may
damage the factory supplied door frame.
CAUTION
CAUTION
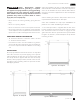
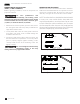
WINE RACK TRIM (OPTIONAL)
All wine reserve racks come with sleek stainless steel fronts.
Unnished solid hardwood fronts are optional and can be
removed and replaced with other wood to match your
cabinetry. See Figure 18 and 19 for wine rack face details.
NOTE: The unnished faces should be nished and sealed.
In many cases, stains and/or nishes have odors that
may be objectionable in an enclosed area. Do not stain
or nish wood faces while installed on unit. To remove
the front wood face from the wine shelf, simply pull out
the wine shelf and remove the fasteners, nish as desired,
and when completely dry, reinstall with fasteners.
Figure 19. Wine Rack Trim, 24” models
Figure 18. Wine Rack Trim, 15” models