
Installation Instructions


PERLICK RESIDENTIAL UNDERCOUNTER INSTALLATION MANUAL
Perlick customer service (800)558-5592 | 7
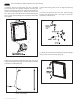
5) Check interior door openings to make sure the unit is
level and square. Install shelving and/or drawers. Place
the slide brackets squarely into the bracket grooves.
When installed properly, a “click” should be heard from
the slide bracket retaining tabs and the brackets should
slide smoothly. The retaining tabs will stop the shelf/
drawer when pulled out to full extension.
6) Turn on the power to the wall outlet at the circuit
breaker.
NOTE: Improper shelf/drawer installation may not actuate
slide mechanism.
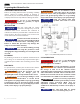
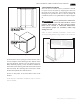
TOE PLATE INSTALLATION
Once the unit is secured in place, install the louvered
toe plate. Secure the plate by snapping the latch into
the latch catch on the unit , and re-attach screws using
through holes provided in the toe kick. A phillips #2
screwdriver, with a 3” long shaft will be required. (Figure
5).
CAUTION
The toe plate must be removed to
service the unit. The oor cannot
interfere with removal, and the louvered sections
must not be covered or obstructed. Obstructions
could prevent proper air circulation, which may
damage the unit.
NOTE: To achieve maximum performance, interior louver
openings and fan guard openings should never be obstructed.
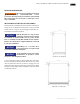
Figure 4. Leveling the Unit
Figure 5. Toe Kick Installation