
Installation Instructions


5
perlick.com
PERLICK RESIDENTIAL INSTALLATION MANUAL
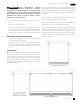
13-⁄”
⁄”
⁄”
DANGER
INSTALLATION
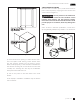
Unit may tip forward if loaded racks/shelves are all pulled
out at the same time. To prevent tipping, and to provide
stable installation, the unit must be secured in place with
the anti-tip brackets supplied with the unit. The anti-tip
brackets, when properly installed, should secure the rear
legs/glides to the mounting surface and prevent the unit
from tipping forward.
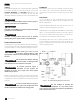
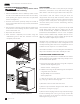
22-⁄”
⁄”
⁄”
Figure 2A. 15” Anti-tip Kit
Figure 2B. 24” Anti-tip Kit
22-⁄” 23-⁄”
1-¾”
⁄”
½“ to hole
⁄”
⁄”
⁄”
Figure 3. 48” Anti-tip Kit
Serious Electrocution Hazard!
Electrical grounding is required.
This appliance is equipped with a 3-prong (grounding)
polarized plug for your protection against possible
shock hazards. Failure to comply with these electrical
guidelines may result in possible death or serious
injury, re, or loss of property.
• Never remove the round grounding prong from the
plug.
• Never use a 2-prong adapter.
• Never use extension cord to connect power to the unit.
• If a 2-prong receptacle is encountered, or a longer power
cord is required, contact a qualied electrician to have it
replaced in accordance with applicable electrical codes.
ADDITIONAL GENERAL INFORMATION
• All electrical instructions assume the outlet is located
4” - 10” above the oor surface.
• Floor must be level in area of installation. Leg levelers
are used for ne-tune adjustment only and should not
be used to compensate for oor dierences exceeding
1/2”.
NOTE: Anti-tip brackets are only used for stationary cabinets
and should not be installed on cabinets with accessory casters.
Caster kits are available for HP, HC and HA model cabinets.
Refer to the instructions supplied with the caster kit for proper
installation.
NOTE: If installing on a concrete oor, concrete fasteners are
required and not included with the anti-tip kit.
NOTE: Some installation sites may require modications to
provide a secure surface for attaching the brackets.
A set of anti-tip brackets is supplied with the unit. These
brackets should be attached to the oor at the rear of the
unit. Each bracket must be located to engage the rear
glides when the cabinet is pushed back into position. Refer
to Figures 2A, 2B and 3 (shown below) for anti-tip bracket
mounting locations.