
installation guide


PERLICK RESIDENTIAL INSTALLATION MANUAL
14
perlick.com
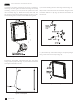
9. Verify that the gasket is fully seated onto the door
frame when completed.
10. After installation of the overlay panel is completed,
verify that the gasket is completely sealing around the
cabinet frame. If installing panels onto drawer models
(-6), repeat installation process for second drawer face.
Installation is now complete.
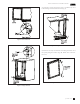
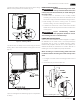
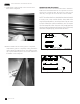
WINE RACK TRIM (OPTIONAL)
All wine reserve racks come with sleek stainless steel fronts.
Unnished solid hardwood fronts are optional and can be
removed and replaced with other wood to match your
cabinetry. See Figure 18 and 19 for wine rack face details.
NOTE:Theunnishedfacesshouldbenishedandsealed.
In many cases, stains and/or nishes have odors that
maybeobjectionableinanenclosedarea.Donotstain
ornish woodfaceswhile installedon unit. Toremove
thefrontwoodfacefromthewineshelf,simplypullout
thewineshelfandremovethefasteners,nishasdesired,
andwhencompletelydry,reinstallwithfasteners.
Figure 19. Wine Rack Trim, 24” models
Figure 18. Wine Rack Trim, 15” models