
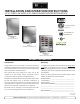
Installation Instructions


Perlick is committed to continuous improvement. Therefore, we reserve the right to change specications without prior notice
7
Form No. Z2363
Rev. 03.03.22
24” HC SERIES, HB SERIES, & HD SERIES UNDERCOUNTER REFRIGERATION
Operation/Installation Manual
USE & OPERATION
DANGER
Do not use or store ammable
liquids (ie; gasoline) or vapors
near the appliance to avoid re.
WARNING
To avoid contamination, use food
safe containers (not included) for
the storage of craft ice in the cabinet’s freezer
compartment. This equipment does not include a
drain and is intended for use with craft ice and other
non-hazardous food stored in food safe containers.
Perlick recommends the use of NSF food certified
containers.
CAUTION
If service is necessary, repair work
should be performed by a Perlick-
authorized service personnel. Work done by
unqualied individuals could create dangerous
conditions in unit that may result in serious injury or
death.
N OTICE
The unit must NOT be totally
enclosed or damage may occur.
REPAIR & MAINTENANCE
WARNING
All service work shall be
performed by Perlick-authorized
service personnel. All component parts shall be
replaced with like components. Incorrect parts or
improper service may result in re.
INSTALLING CASTERS OR LEGS OPTIONAL
Attach bracket assembly to the bottom of the cabinet
base using the ¼”-20 Philips head machine screws
provided. Attach casters or legs to the mounting bracket
with ¼” – 20 Philips head screws provided
N OTICE
To comply with NSF requirements,
cabinet must be sealed to oor or
on legs, casters, or rollers.
PLACING THE CABINET
To assure maximum performance, fresh air must
be allowed to circulate through the machinery
compartment. Do not place anything in front of the
cabinet that would obstruct air ow at these grilles. Do
not place the unit in an unventilated small room.
N OTICE
Cabinet should be leveled front to
back then side to side.
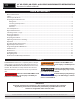
INSTALLING ANTITIP BRACKETS
Unit may tip forward if loaded racks/shelves are all pulled
out at the same time. To prevent tipping, and to provide
stable installation, the unit must be secured in place with
the anti-tip brackets supplied with the unit. The anti-tip
brackets, when properly installed, should secure the rear
legs/glides to the mounting surface and prevent the unit
from tipping forward.
Please note:
• Anti-tip brackets are only used for stationary cabinets
and should not be installed on cabinets with accessory
casters. Caster kits are available for HC and HB model
cabinets. Refer to the instructions supplied with the
caster kit for proper installation.
• If installing on a concrete oor, concrete fasteners are
required and not included with the anti-tip kit.
• Some installation sites may require modications to
provide a secure surface for attaching the brackets.
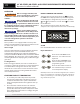
A set of anti-tip brackets is supplied with the unit. These
brackets should be attached to the oor at the rear of the
unit. Each bracket must be located to engage the rear
glides when the cabinet is pushed back into position.
Refer to Figure 1 (shown below) for anti-tip bracket
mounting locations.
22-⁄”
⁄”
⁄”
Figure 1. 24” Anti-Tip Bracket