Installation & Operation Manual 24" C-Series Refrigerator Wine Reserve Beverage Center
4" C-Series Operation / Installation Manual TABLE OF CONTENTS Introduction . . . . . . . . . . . . . . . . . . . . . . . . . . . . . . . . . . . . . . . . . . . . . .1 Warranty Registration . . . . . . . . . . . . . . . . . . . . . . . . . . . . . . . . . . . . . .1 General Precautions . . . . . . . . . . . . . . . . . . . . . . . . . . . . . . . . . . . . . . .2 Installation Specifications . . . . . . . . . . . . . . . . . . . . . . . . . . . . . . . . . . .2 Preparing the Space . . . . . . . . . . . . .
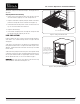
24" C-Series Operation / Installation Manual GENERAL PRECAUTIONS DANGER Risk of child entrapment. Before you throw away your old refrigerator or freezer, take off the doors and leave shelves in place so children may not easily climb inside. DANGER Altering or cutting of the power cord, or removal of the power plug, or direct wiring can cause serious injury, fire and/or loss of property and/or life and will void the warranty. CAUTION • Do not lift unit by shelves or door handle.
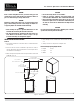
24" C-Series Operation / Installation Manual PREPARING THE SPACE Make sure the installation opening is properly prepared. Refer to Figure 1 for space dimensions. CAUTION If unit is to be installed under a countertop, it is recommended that the countertop be supported by a structure other than the unit itself, to prevent damage to the countertop. IMPORTANT: For a cabinet door to operate properly, the door must open a minimum of 100° (see Figure 1).
24" C-Series Operation / Installation Manual INSTALLATION Void area in cabinetry for Unit CAUTION Finished flooring should be protected with appropriate material to avoid damage from moving the unit. If unit has been laid on its back or sides, place unit upright and allow minimum of 24 hours before connecting power. 1. Plug the unit into the 15 amp grounded outlet located in the installation opening.
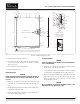
24" C-Series Operation / Installation Manual allowing for storage of both wine and beverages. Shelving positions are adjustable. Adjusting Full Extension Shelving 1. Pull the shelf out to its farthest position. Locate the tabs in the middle of both extenders (Figure 4). Press tabs and pull shelf out. 2. Reposition each bracket separately. Grasp the middle of the bracket, pull the front end up and out, then forward to remove (Figure 5). 3. Place bracket at the desired position.
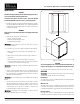
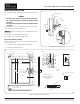
24" C-Series Operation / Installation Manual WOOD OVERLAY INSTALLATION Before beginning installation, check all components for proper fit and finish. Mounting bracket Nut WARNING • All overlay doors require a trim panel at least 3/4" thick. • The solid wood overlay panel should not weigh more than 20 pounds. • The glass wood overlay panel should not weigh more than 10 pounds. The following instructions cover installing a solid wood overlay or glass wood overlay panel, handle and optional lock.
24" C-Series Operation / Installation Manual 22 3/16” Ø 1/8” /2” Deep 27 /32” 22 23/323” 13 9/32” 10 9/32” 19 57/64” 3 11/16” 17 /32” 1 0” Ø 3/4” Thru 0” 13 /64” 1 25/32” 3 /64” 27 /32” 3 11/16” R 1 11/16” 2 1/8” 13 /16” 2” 1 1/16" 3 7/32” 13 39/64” 27 /64” 1 13/64” A These (2) holes not to be drilled for a door with lock 29 13/16” Detail A Scale 1:2 All features called out in this detail view apply only to panels being used on locking doors 15 7/64” Locking door only 16 3
24" C-Series Operation / Installation Manual WOODEN WINE RACK TRIM FINISHING All wine racks come with an unfinished solid hardwood face, which can be removed and replaced with other wood to match the surrounding cabinetry. The included unfinished faces can be finished and sealed. In many cases, stains and/or finishes have odors that may be objectionable in an enclosed area. To remove the front wood face from the wine shelf, simply pull out the wine shelf and remove the fasteners.
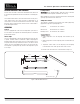
24" C-Series Operation / Installation Manual MAINTENANCE WARNING Shut off the electricity to the unit before cleaning the condenser and other routing maintenance. Cleaning To clean stainless steel exterior or interior surfaces, use a soft, non-abrasive stainless steel cleaner to wipe down the surfaces. Glass doors can be cleaned using any standard glass cleaner available on the market. Figure 10.
24" C-Series Operation / Installation Manual TROUBLESHOOTING If the unit appears to be malfunctioning, read through the OPERATION section first, then check the guide below to identify and resolve the problem. DANGER Electrocution hazard! Never attempt to repair or perform maintenance on the unit until the main electrical power has been disconnected. No interior light • Is the bulb loose? • Is the bulb burned out? Light stays on when the door is closed • Manual ON/OFF light switch is turned on.
24" C-Series Operation / Installation Manual Condensation forms on the outside of the unit • During periods of high humidity, some condensation might appear on the outside surface. The condensation will disappear when the humidity drops. Meanwhile, be sure doors are closing and sealing properly. If condensation persists, contact your Perlick Factory Authorized Service Center. To obtain product information • Contact your selling dealer. • Inquire on the web at www.bringperlickhome.com.
24" C-Series Operation / Installation Manual PERLICK HOME REFRIGERATION PRODUCTS LIMITED WARRANTY ENTIRE PRODUCT- Full Two Year Warranty: For two years from the date of original installation, Perlick Corporation’s warranty covers all parts and labor to repair or replace any part of the product, which proves to be defective in material and workmanship.
8300 W. Good Hope Road • Milwaukee, WI 53223 • 1-800-558-5592 • Fax: 414-353-7069 • www.bringperlickhome.com Perlick is committed to continuous improvement. Therefore, we reserve the right to change specifications without warning. © 2008 24" C-Series Installation / Operation Manual Document No.