
Instruction Manual
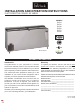


FLAT TOP BOTTLE COOLERS
Operation/Installation Manual
Perlick is committed to continuous improvement. Therefore, we reserve the right to change specications without prior notice
6
USE & OPERATION
DANGER
Do not use or store flammable
liquids (ie; gasoline) or vapors near
the appliance to avoid re.
CAUTION
If service is necessary, repair work
should be performed by a Perlick-
authorized service personnel. Work done by unqualied
individuals could create dangerous conditions in unit
that may result in serious injury or death.
NOTICE
The unit must NOT be totally
enclosed or damage may occur.
REPAIR & MAINTENANCE
WARNING
All service work shall be performed
by Perlick-authorized service
personnel. All component parts shall be replaced with
like components. Incorrect parts or improper service
may result in re.
INSTALLING CASTERS OR LEGS OPTIONAL
Attach bracket assembly to the bottom of the cabinet base
using the ¼”-20 Philips head machine screws provided.
Attach casters or legs to the mounting bracket with ¼” – 20
Philips head screws provided
NOTICE
To comply with NSF requirements,
cabinet must be sealed to oor or
on legs, casters, or rollers.
ADJUSTABLE PARTITIONS & SHELVING
Perlick Bottle Coolers may be provided with adjustable
partitions and shelving which will accommodate various
bottle sizes.
• Remove bottles and cans from their cases before
placing in cooler to ensure proper air ow.
• When loading product into cabinet, care must be
taken to avoid blocking airow into and out of the
evaporator. Maintain at least 2” of clearance on
evaporator air intake and exhaust for proper
operation.
PLACING THE CABINET
To assure maximum performance, fresh air must
be allowed to circulate through the machinery
compartment. It is important to allow at least two inched
of clearance at the back or left end of the cabinet. Do
not place anything in front of the cabinet that would
obstruct air ow at these grilles. Do not place the unit in
an unventilated small room.
CAUTION
Removing the factory installed
back clearance spacers without
providing proper left side grill clearance for
compressor air ow will void the warranty.
Cabinet should be leveled.
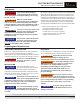
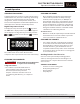
For sanitation purposes, it may be necessary to seal the
base of the cabinet to the oor. This can be accomplished
by laying a bead of silicone sealant along the base of the
cabinet as shown by the gure below (gure 1).
Cabinet
Bead Silicon
Sealer (RTV)
Floor
Figure 1. Sealing Cabinet to Floor
Use and Operation