
User Manual
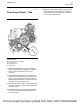
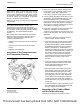
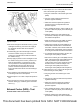
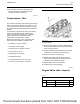

Illustration 57 g02529617
Typical example
1. Disconnect the pipe for the boost sensor (1) at the
wastegate actuator (2). Connect an air supply to
the wastegate actuator that can be adjusted
accurately.
2. Install Tooling (A) to the turbocharger so that the
end of the actuator rod (3) is in contact with
Tooling (A). This will measure axial movement of
the actuator rod (3).
3. Slowly apply air pressure to the wastegate so that
the actuator rod (3) moves 10 mm (0.3937 inch).
Refer to Specifications, “Turbocharger” for the
correct pressure for the wastegate. Ensure that
the dial indicator returns to zero when the air
pressure is released. Repeat the test several
times. This will ensure that an accurate reading is
obtained.
4. If the operation of the wastegate is not correct, the
turbocharger will need to be replaced.
5. Repeat steps 2 to 3 in order to repeat the pressure
test.
6. If the air pressure is correct, remove the air supply.
Remove Tooling (A). Install the pipe for the boost
sensor (1).
i04552042
Exhaust Cooler (NRS) - Test
Air Under Water Leak Test Procedure.
1. Follow steps 1.a to 1.i in order to test the coolant
side of the exhaust gas cooler (NRS).
a. Plug the coolant inlet of the exhaust gas cooler
(NRS).
b. Plug the coolant outlet port with tube and
pressure regulator assembly.
c. Make sure that the air pressure regulator is
closed and connect compressed air to the
pressure regulator.
d. Use a suitable air supply in order to apply an air
pressure of 250 kPa (36 psi) to the exhaust gas
cooler (NRS).
e. While the exhaust gas cooler (NRS) is still
pressurized, submerge the cooler in water that
is at ambient temperature.
f. Allow the exhaust gas cooler (NRS) to settle in
order for the air that is trapped to escape.
g. Observe the exhaust gas cooler (NRS) for air
bubbles that indicate a leak. If air bubbles are
seen within 3 minutes, this indicates a leak with
the exhaust gas cooler (NRS). Note the location
or the origin of the leak. Record this information.
h. If no bubbles are detected after 3 minutes, the
exhaust gas cooler (NRS) is reusable.
i. Remove the exhaust gas cooler (NRS) from the
water. If the exhaust gas cooler (NRS) does not
leak, the problem may be elsewhere in the
cooling system or the engine. Refer the service
manual in order to check for leakage. If the
exhaust gas cooler (NRS) does leak, the
exhaust gas cooler (NRS) should be replaced.
2. Follow steps 2.a to 2.i in order to test the gas side
of the exhaust gas cooler (NRS).
a. Plug the gas inlet of the exhaust gas cooler
(NRS).
b. Plug the gas outlet port with tube and pressure
regulator assembly.
c. Make sure that the air pressure regulator is
closed and connect compressed air to the
pressure regulator.
d. Use a suitable air supply in order to apply an air
pressure of 250 kPa (36 psi) to the exhaust gas
cooler (NRS).
e. While the exhaust gas cooler (NRS) is still
pressurized, submerge the cooler in water that
UENR0623-02 67
Air Inlet and Exhaust System
This document has been printed from SPI2. NOT FOR RESALE