
User Manual


48
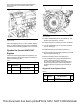
Illustration 98 g02901685
Typical example
1. Remove nuts (2) from power take-off drive (1).
2. Remove the power take-off drive (1) from the
cylinder block.
3. Remove O-ring seal (3) from power take-off drive
(1).
4. Note the position of dowel (4) and dowel (5) in the
power take-off drive. Do not remove the dowels
unless the dowels are damaged.
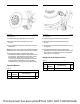
Illustration 99 g03240056
Typical example
5. Remove nuts (7) from power take-off drive (1).
6. Remove cover (11) from power take-off drive (1).
Discard cover (11).
7. Remove O-ring seal (not shown) from power take-
off drive (1). Discard O-ring seal.
8. Remove bolts (10) from power take-off drive (1).
9. Remove cover (9) from power take-off drive (1).
10. Remove O-ring seal (8) from power take-off drive
(1). Discard O-ring seal.
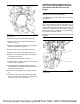
11. Install the driven equipment to studs (6).
12. Install nuts (7) to studs (6). Tighten nuts to a torque
of 45 ± 3 N·m (33 ± 2 lb ft).
13. Install the gear to the driven equipment. Ensure
that the gears are engaged. Tighten the nut for the
gear to the correct torque.
14. Install new O-ring seal (8) to power take-off drive
(1).
15. Install cover (9) to power take-off drive (1). Install
bolts (10) to power take-off drive (1). Tighten bolts
to a torque of 10 ± 1 N·m (89 ± 9 lb in)
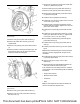
16. If necessary, install dowel (4) and dowel (5) into
power take-off drive (1).
17. Install a new O-ring seal (3) onto power take-off
drive (1).
18. Position power take-off drive (1) onto the cylinder
block.
Note: Ensure that the drive gear for the power take-
off drive is correctly engaged with the gear on the
crankshaft.
19. Equally tighten bolts (2) to pull power take-off drive
(1) into the cylinder block
20. Tighten nuts (2) to a torque of 35 ± 3 N·m
(26± 2 lb ft)
21. Ensure that there is tactile backlash between the
idler gear and the accessory drive gear.
If the customer has used this process, the customer
must maintain a record of assembly with the following
information:
• Engine serial number
• Machine serial number
• Technician
• Date
Note: A visual inspection should be undertaken to
check for oil leaks from all joint faces.
This document has been printed from SPI2. NOT FOR RESALE