
User Manual


32
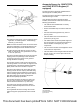
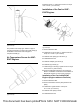
1. Remove protective cap from ammonia sensor.
Ensure that the threads of ammonia sensor have
sufficient anti-sieze compound applied. Install
ammonia sensor (1) to the OEM tube assembly.
Tighten the sensor to a torque of 50 ± 10 N·m
(37 ± 7 lb ft).
Note: Ensure that the harness is not twisted when the
sensor is tightened.
Illustration 67 g03694440
Typical example
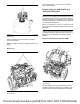
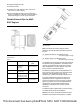
2. Position control module (4) to a suitable position on
the application. Install the two washers and the two
M6 bolts to the application. Tighten the M6 bolts to
a torque of 10 to 13 N·m (89 to 115 lb in).
3. Connect connection (3) to control module (4).
Ensure that the connectors for the connection and
control module are secure. An audible click should
be heard when connector latch is closed.
4. Connect harness assembly to control module (4).
Ensure that the connectors for the harness
assembly and control module are secure. An
audible click should be heard when connector latch
is closed.
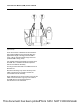
Product Lifting
Product Lifting for 1206F-E70TA, and
1206F-E70TTA Engines
NOTICE
Never bend the eyebolts and the brackets. Only load
the eyebolts and the brackets under tension. Remem-
ber that the capacity of an eyebolt is less as the angle
between the supporting members and the object be-
comes less than 90 degrees.
When it is necessary to remove a component at an
angle, only use a link bracket that is properly rated for
the weight.
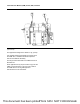
Read all the information within produce lifting before
any lifting is attempted. Ensure that the correct set of
lifting eyes for the assembly to be lifted have been
selected.
Engine and Clean Emission Module (CEM)
Use a hoist to remove heavy components. Use an
adjustable lifting beam to lift the assembly. All
supporting members (chains and cables) should be
parallel to each other. The chains and cables should
be perpendicular to the top of the object that is being
lifted.
This document has been printed from SPI2. NOT FOR RESALE