
Instructions / Assembly


0180_Jan20_AlumSub P.4
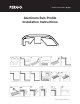
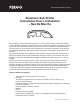
Aluminum Sub-Prole | English
D. Installation of ooring
1. Measure the width of the stair. Use a square to measure any ‘out of square measurements’
against the stringers. Mark the planks and cut to length. If the stairs are open ended, the 5 in
1 moldings and the aluminum sub-prole can be mitered on a 45-degree angle to be able to
cover the return. Take care to account for the mitered angles in your measurements for this
conguration.
2. Measure the depth of the stair. The aluminum sub-prole is designed to work with the
tongue side of a ooring plank. Place the cut plank of ooring over the sub-prole. The ridge
in the sub-prole is designed to t into a notch on the underside of the ooring plank. Measure
the distance from the end of the plank to the riser of the next stair and rip a ooring plank to
this distance. Make sure, to include the tongue side of the second plank so the pieces can be
clicked together to make a tread assembly (6, 7, 8, 10).
3. Now t the tread assembly into place and check that all adjustments have been made. You
will now remove the newly assembled tread from its placement so you can prepare the tread
for permanent installation.
4. Apply construction adhesive to both the sub-prole and the tread it is attached to. Smooth
out the adhesive on the sub-prole with a putty knife so no lifting of the assembled tread will
occur when it is placed on top. Now place a number of at wood shims on the tread so the
tread will be the same level (height) as the aluminum sub-prole. These shims will allow you to
work on the installed tread once it is in place (11, 12).
5. With everything prepped, place the assembled tread in position. Minor shimming of the tread
against the riser will hold the tread rmly in place.
E. Installation of the 5 in 1 multifunctional molding
1. Measure the distance for a clean t between the stringers. After cutting to length, turn over
the 5 in 1 and apply a strip of adhesive along both sides of the leg and a ne bead along the
groove that will cover up the tongue of the assembled stair tread already installed. If necessary,
remove the required portion of the 5 in 1 multi-functional molding using the supplied cutting
tool. Do this before applying adhesive. Starting at one end, press rmly on the 5 in 1 and t the
leg of the 5 in 1 into the track of the aluminum sub-prole. Minor tapping with a hammer will
ensure a tight ush t to the assembled stair tread and lower riser. For open ended stairs, miter
the molding on a 45-degree angle to t with the installed sub-proles (13, 14, 15, 16).
2. Use tape to hold the 5 in 1 and assembled tread in position and help prevent minor gapping
or over-wood if required. Remove all tape immediately after the glue’s recommended drying
time.
NOTE: Make sure you have cleaned up all adhesive prior to moving on to the next task.
3. Repeat steps B - E until reaching the tread of the topmost stair.
F. Installation at Landing (Top Stair Nose)
1. If the top landing is going to have ooring installed on it, the distance to the rst expansion
gap will have to be noted. Continue with the correct installation as described below.
2. If the top landing is less than 8 feet across, then continue installation following the same
steps as above for a ush mount installation.
3. If the installation is greater than 8 feet, or if the laminate ooring installation does not result
in the tongue side of the ooring ending at the stairs, then the overlap conguration must be
used.