
Instructions / Assembly


0180_Jan20_AlumSub P.3
Aluminum Sub-Prole | English
where more than 8 feet of ooring will be installed perpendicular to the stair nose. The overlap
conguration allows for the appropriate expansion necessary for a stable laminate ooring
installation. Additionally, when using the overlap application, the stair riser (vertical portion of
stair) must be covered with laminate ooring.
The remainder of these instructions will describe the installation process using the ush mount
conguration. The dierences for the overlap application are noted in the last section.
INSTALLATION FOR STAIR TREADS & RISERS
When installing stairs, there is no need to have on expansion joint. The oor will not oat, it
will be glued down. Under no circumstances should underlayment be placed on stair steps or
risers.
NOTE: Use the correct adhesive. We recommend a gap lling construction grade adhesive.
A. Preparation of the existing stairs
1. Treads and risers should be structurally sound, at, dry, clean, smooth, and free from paint,
varnish, wax, oils, solvents, and other foreign matter.
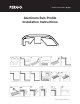
B. Begin the installation on the bottom most stair.
1. If you are going to cover the stair riser with laminate ooring measure the bottom riser to
get the required length and height (1). If you would like to paint the riser, then skip to part C. In
order to cover with ooring this may require clicking two or more plonks together to achieve the
full riser height. Cut the assembled riser to the correct length rst. (If the stairs are enclosed,
the short sides should t ush to the stringers. If stairs are open on sides,
riser ends will have to be nished with a trim, which can be a piece of the 5 in 1
multifunctional molding.) The bottom edge of the assembled riser will require the removal of the
tongue of the ooring. Cut the top of the assembled riser to t from the main oor to be ½ to
5
/
8
of an inch shorter than the existing oor tread (2).
2. Glue the assembled riser in place by applying construction adhesive to the back of the
assembly in an “S” pattern and pressing it rmly into place (3). Make the bead approximately ¼
of an inch in width.
3. Installation will continue with the installation of the tread and stair nose. This process will
repeat for all stairs in the project.
C. Installation of sub-prole
1. Measure the length of the stair tread and cut the aluminum sub-prole to ¼" shorter than
this length (4).
2. Place the aluminum sub-prole on the edge of the rst tread (without adhesive) Check that
the aluminum sub-prole sits at on the stair tread.
3. Remove the sub-prole and drill holes every 6 inches. Make sure to countersink these pre-
drilled holes so the screw heads do not protrude.
4. Apply construction grade adhesive to the bottom of the aluminum sub-prole and press
rmly in place on the stair tread. Fasten in place with #6 or #8 1½-inch countersunk wood
screws. Do not over tighten, as the prole may bend, or screw heads may pass through the
prole (5).