
Installation Guide


PERGO American Era 3/4” Solid Hardwood Flooring Installation Instructions
5
MULTI-WIDTH INSTALLATION
Installing planks of multiple widths requires special consideration.
Multi-width products arrive in the same carton, so measure material
needs as you normally would.
Always start installation with the widest plank and install in descending
widths, for example 5”, 3”, 5”, 3”.
Do not try to mix widths within a row.
RACKING INSTALLATION
Start by using random length planks from the carton or by cutting four
to five planks in random lengths, differing by at least 6”. As you continue
working across the floor, be sure to maintain the 6” minimum stagger
between end joints on all adjacent rows. Never waste material. Use the
leftover pieces from the fill cuts to start the next row or to complete a row.
NOTE: When installing a pre-finished wood floor, be sure to blend the wood
from a minimum of three cartons to ensure a good grain and shading
mixture throughout the installation.
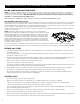
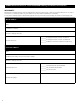
Step 1 – Layout
• Measure and mark 3” from the wall at two spots near each end of the
room. Drive a nail at each spot. Stretch string and tie each end of the
string around the nails so the nails become posts. Use the string as
your flooring guide.
NOTE: This dimension should be 4” when installing 3-1/4” wide
flooring. When a room is greater than 20 ft. in width, the direction
of the installation should start near the center of the room and work
out towards the walls, placing a loose spline where the two grooves
come together.
Step 2 – Install first row
• Using the string as a straight edge, lay the first row of flooring in place
with the tongue facing the center of the room. Leaving a 3/4” gap at
the wall, pre-drill and face nail using 10D nails. Continue nailing the
entire length of the room.
• Leave a 3/4” expansion gap at each end. Set nails and fill holes with
matching putty. Remove string and nails.
Step 3 – Install remaining rows
• Continue the laying process using a mechanical fastener until the
room is complete (See Recommended Pneumatic Floor Stapler
or Nailer).
Helpful Hint: Use flooring lengths that offset or stagger the end joints at
least 6” or more for a professional look.
• Carefully cut the last row to leave a 3/4” expansion space.
• Replace or install trim moldings.
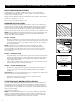
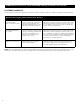
STAPLE OR NAIL DOWN INSTALLATIONS
The 3/4” solid hardwood flooring may be installed over wood subfloors
using staples or flooring cleats. When installing 3/4” solid wood planks
or strips by nailing or stapling, it is necessary to use the proper type of
flooring stapler or nailer made for the thickness of the hardwood flooring
that is being installed.
(See fastener schedule.)
NOTE: It is extremely important to use the proper adapters, face plates,
staples or cleats. Improper fasteners, stapler, nailer or air pressure can
damage flooring. Flooring manufacturer is not responsible for damage
caused by improper installation tools, methods or misuse.
6” minimum stagger
between end joints
Tongue of wood flooring
facing center of room
3/4” space for expansion at
ends and against walls
String guide and nails
Subfloor
(beneath felt)
15 lb felt
String Guide
3/4” 3/4”
Nail
3/4” space for expansion
at ends and against wall