
Installation Guide

Measure the length and width of the wall area to determine the total
square footage area. Order that amount of ooring plus an additional
10% for incorrect cuts.
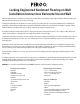
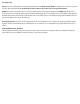
Remove baseboards from the accent wall and locate the wall studs using
the stud nder tool. Mark vertical lines over all studs. Use painters tape to
extend stud location to ceiling if needed. (Figure 1)
Turn o power while working around wall outlets and light switches.
Pay special attention to avoid contact with electrical wiring.
Accent Wall
Existing Dry Wall Typical
Wall Studs Marked
Painters
Tape
1
1a
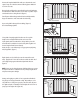
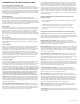
Check floor
levelness
pieces will cover entire length
2
3/16"
Gap
3/16"
Gap
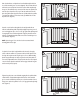
silicone applied in “s” pattern
3
3/16"
Gap
3/16"
Gap
3a
Inspect each plank for damage before installing. (Figure 1a)
Do not install damaged planks.
Select planks of varying lengths for the rst row. Choose plank
lengths so that each plank will be nailed to at least one stud.
Lay the planks on the oor with the face side up and the groove side
toward the wall. Assemble the short ends of the planks together and
measure length to t the rst row (bottom).
Cut the last piece as needed leaving a 3/16” gap against any adjoining
walls, if applicable. (Figure 2)
Flip the planks over (it is ok if they become disconnected from each
other). Apply a bead of 100% silicone adhesive caulk to the back side of
each locking locking engineered hardwood plank in the rst row.
(Figure 3)
NOTE: You may need to adjust placement of the rst plank row to account
for any oor unevenness so that the rst row is perfectly straight and all
end joints remain square and tight.
Starting on the right, press plank 1 of row 1 against the wall with the
long side groove facing up towards the ceiling. Repeat this process for
each plank in row 1, being sure to properly connect the short side joints
to be tight and square. Continually check and adjust the level of row 1 as
you progress from right to left. (Figure 3A)