
Installation Guide

Pergo Solid Installation Instructions 02172016
Page 3
Warranties DO NOT cover products installed over
improperly prepared subfloors, substrates or
environmental related deficiencies.
DO NOT INSTALL FLOORING IF MOISTURE TESTS RESULTS
EXCEED RECOMMENDED LIMITS.
Wood Subfloor Moisture Content
Test both wood subfloor and wood flooring for moisture content using
a reliable pin type moisture meter. The subfloor material must not
exceed 12% moisture content. The difference between the moisture
content of the wood subfloor and the hardwood flooring must not
exceed 4%. For hardwood products greater than 3” wide, the moisture
content of the wood subfloor and hardwood floor should not differ more
than 2%.
INSTALLATION HELPFUL HINTS
1. Use solid flooring only on or above ground level only.
2. Make sure mechanical fastener is approved for use in OSB if plywood
is not used as a substrate.
3. Lay out several cartons to check quality and grading and “rack”
or stagger the end joints in random lengths.
4. Leave ¾” at all perimeter walls and vertical structures to allow for
expansion.
5. The mechanical fastener cannot be used on the first and last few
rows. Pre-drill, nail with 10D nails, countersink nails and use
matching putty to fill nail holes.
6. Rows to be hand nailed may be drilled at an angle through the
top of the tongue to hide nail heads.
7.
I
ns
t
a
ll
f
lo
or
ing
perpend
i
c
u
lar
t
o
t
h
e
d
ir
e
c
t
ion
o
f
t
h
e
f
lo
o
r
joi
s
t
s
.
8. Occasionally, a plank may be slightly bowed. Nail one end first,
and then use the pry bar to push the other end in place.
Installer should record moisture test results in the space provided on
the page 5 of this document and leave with the owner for their records.
NOTE: Basements and crawl spaces must be dry. Use of a 6 mil black
polyethylene membrane is required to cover 100% of the crawl space
earth and run approximately 6” up the foundation walls. The seams
of the 6-mil poly should overlap 4” to 6” and should be taped to the
foundation walls using an aggressive tape such as duct tape. This will
help retard moisture from below that is emitted from the soil. Crawl
space clearance from ground to underside of joist should be no less
than 18” and perimeter vent spacing should be equal to 1.5% of the
total square footage of the crawl space area to provide cross
ventilation.
To correct any subfloor conditions concerning moisture, either wait
until the subfloor dries to meet specifications or use an appropriate
moisture barrier. For more information concerning moisture conditions,
contact Technical Service Department at 1 - 8 0 0 - 3 3 - P E R G O
BEFORE YOU START:
• Plan y o u r l a y o u t a n d d e t e r m i n e t h e d i r e c t i o n
o f t h e installation in the room. Planks installed parallel to
windows accent the hardwood best.
• Remove existing base, shoe molding or threshold carefully.
They can be used to cover the ¾” expansion gap left around
the perimeter of the room.
• Undercut doors and casings using a handsaw laid flat on a
piece of scrap flooring. This will eliminate difficult scribe
cuts.
• Sub-floors should be clean prior to the floor installation.
Sweep the area to remove all dust and debris.
• Make sure the subfloor is dry to 12% moisture content or
less.
• Install 15lb. felt paper to help reduce squeaks.
• Blend cartons: To achieve a uniform installation
appearance, preselect and set aside hardwood planks that
blend best with all trims and moldings. Install these planks
next to best blended moldings.
• Install planks from several cartons at the same time to
ensure good color and shade mixture throughout the
installation.
• Be attentive to staggering the ends of the boards at least 4”
– 6” (10-15 cm) when possible in adjacent rows.
9. Using shorter pieces at undercut door jams will help when fitting
flooring in place.
MULTI WIDTH INSTALLATION:
Installing planks of multiple widths requires special consideration. Multi
Width products arrive in the same carton, so measure material needs
as you normally would.
Always start installation with the widest plank and install in descending
widths (example 5”, 3”, 5” 3”).
Do not try to “mix” widths within a row.
INSTALLATION
“Racking the Floor”
Start by using random length planks from the carton or by cutting four
to five planks in random lengths, differing by at least 6”. As you continue
working across the floor, be sure to maintain the 6” minimum stagger
between end joints on all adjacent rows. Never waste material; use the
left over pieces from the fill cuts to start the
next row or to complete a row.
Note: When installing a pre-finished wood floor be sure to blend the
wood from several cartons to ensure a good grain and shading
mixture throughout the installation.
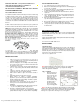
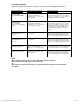
Step 1 – LAYOUT
• Measure and mark 3”
From the wall at two
spots near each end
of the room. Drive a
nail at each spot.
Stretch string and tie
each end of the string
around the nails so
the nails become
posts Use the string
as your flooring guide.
Note: This dimension should be
4” when installing 3 ¼” wide flooring.
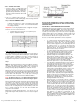
• All cartons scheduled to install are to be checked for When a room is greater than 20 ft. in width, the direction of the installation
consistency of the lot numbers. Do not install from multiple should start near the center of the room and work out towards the walls
pallets without checking color and lot number compatibility. Placing a loose spline where the two grooves come together.