
Installation Guide
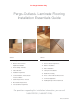

For Pergo Outlast+ Only
Revised: 3-Jan-2018
■
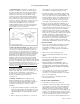
Tread
with an extended and square edge nosing.
On this style of tread,
simply cut a narrow
strip of Pergo
Outlast+ and glue it
on the edge of the
existing tread.
Install the tread and
riser and finish the
edge with a nosing.
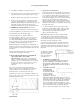
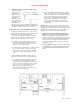
The illustration at
right shows square edge nosing with Pergo Outlast+ on
the edge, and installed Pergo Outlast+ on the tread and
riser with a nosing finishing the nose of the tread.
PERG O OUTLAST+ ON STAIR TREADS AND RISERS
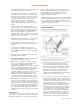
1. Dry fit the Pergo Outlast+ planks net, or snug, stringer to
stringer (from left to right side). Remember that the depth
of Pergo Outlast+ tread material will be cut to
accommodate the width of the nosing which overlaps
either a riser of Pergo Outlast+ or the piece of Pergo
Outlast+ which is glued on the edge of the step.
a. One plank of Pergo Outlast+ will finish most risers;
however, two planks of Pergo Outlast+ will be
needed for the tread since tread depth exceeds the
width of one Pergo Outlast+ plank.
b. Personal preference will determine your choice to install
the riser or the tread first. In either event, the joint
between the tread and riser should be sealed with
100% silicone sealant. Quarter round can also be
used.
2. After dry fitting, the Pergo Outlast+ planks must be
adhered to the stair treads in one of the following ways:
a. Fully spread a premium quality parquet adhesive on
the tread and riser. This should be performed in
accordance with the manufacturer’s specifications.
Remove the attached underlayment before gluing.
Make sure to press the Pergo Outlast+ into the
adhesive to get proper bonding. Allow the
recommended amount of time for the adhesive to
fully set up before using the stairs.
OR
b. Remove the attached underlayment before gluing.
Apply several continuous beads of a premium quality
construction adhesive across the full width of the tread
and riser. This should be performed in accordance
with the adhesive manufacturer’s specifications.
Firmly press the Pergo Outlast+ into the adhesive to
ensure proper bonding. Allow the recommended
amount of time for the adhesive to fully set up before
using the stairs.
NOTE: On wood or concrete surfaces, stair nosing must be
fastened with construction adhesive and screws to the treads. A
stair application is the ONLY time that a Pergo Outlast+ floor is
glued directly to a substrate. Pergo Outlast+ is installed as a
floating floor for a step down and all other applications.
■
Mechanical Fasteners for Stair Nosing Over Wood
Subfloors: Use a premium grade of construction adhesive
and trim screws at least 11/8" in length. Drill holes in the
molding for the fasteners. Countersink the screws and fill
with color matched finishing putty. When fastening the stair
nosing, space screws 2 inches from each baseboard or
stringer and a maximum distance of 8 inches apart down
the length the nosing.
■
Concrete Subfloors: Drill into the concrete subfloor with a
carbide drill bit. Insert an appropriate plug into the concrete
to accommodate the fastener then follow the procedure
above.