
Installation Guide

For Pergo Outlast+ Only
Revised: 3-Jan-2018
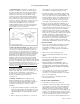
terrazzo providing they are smooth, sound and dry. These
flooring materials must be smooth and flat to within
3
⁄16" in
a 10' radius. (See Subfloor Requirements/General, section
7.)
d. Use Pergo Moisturbloc
TM
, or equivalent, if the subfloor is
concrete.
• Pergo Outlast+ has an attached foam underlayment.
Use only a vapor barrier when installing over a
concrete subfloor.
• When installing Pergo Outlast+ with attached
underlayment foam over a wood subfloor, no other
additional foam underlayment is required.
11. NE W
CONSTRUCTION
R
E QUIREM E NTS - There are
several special considerations that must be evaluated before
installing Pergo Outlast+ flooring in new construction.
a. As with all wood-based flooring products, the installation
should be scheduled as late in the building cycle process
as possible. This will prevent any unnecessary damage
from occurring as the result of other trades involved with
the construction process. Always protect the floor if other
trades will be walking on the floor after installation.
b. The house/building must be closed and the climate controls
should be in operation for at least two weeks. The
temperature should be maintained between 60°F and 85°F
during these two weeks and the relative humidity should
average between 35% and 65%.
c. Close attention must be paid to the condition of the subfloor.
(See sections 7 through 10 for your specific subfloor
requirements.)
d. Moisture in the wood or concrete subfloor, foundation walls,
basement, or crawl space must be checked and verified to be
in compliance with the subfloor requirements. (See Job Site
Evaluation, section 6 — exterior/interior moisture conditions
and sections 7 through 10 for your specific subfloor
requirements.)
e. Kitchen cabinets should be installed before the
fl
oor is
installed. However, cabinets may be installed after the
floor is in place providing the cabinets, island cabinets,
etc. are not fixed/attached to the Pergo Outlast+ floor.
Island cabinets can be anchored to the subfloor. The
holes for the anchoring bolts or screws must be
3
⁄4" on
center, larger than the diameter of the bolts or screws —
this allows for the
3
⁄8" expansion space needed for a
floating floor to move without being obstructed by the
fastener. Other cabinets must be fastened to walls or to
the subfloor as described for island cabinets.
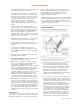
f. The perimeter of the installation must be sealed. Create
a watertight seal by applying flexible 100% silicone
sealant to the entire perimeter of the installation. Do not
use acrylic sealant.
First fill all expansion spaces with 3/8”
compressible PE foam backer rod and cover
with 100% silicone sealant. Be sure the
silicone completely covers the expansion
space from the edge of the floor to the vertical
surface, with no gaps or spaces.
Prior to installing the moldings, apply 100%
silicone sealant to the portion of the molding
or transition that will contact directly with the
laminate flooring surface.
Install moldings and immediately wipe away
any excess silicone sealant.
Apply 100% silicone sealant at connections to
doorframes or any other fixed objects.
12. BATHROOM
INSTALLATIONS -
Because the Pergo
Outlast+ surface is resistant to water, it can be installed in
bathrooms. However, it is very important to prevent water or
moisture from getting under the floor.
Installation in bathrooms must be made in accordance with the
following instructions:
a. All expansion spaces, between the Pergo Outlast+
flooring and walls, the doorway transition or other
fixed objects such as pipes for radiators, sinks, water
supply to water closet or toilet flanges MUST be
filled with 3/8” compressible PE foam backer rod and
covered with 100% silicone sealant.
b. The space around the perimeter of the Pergo Outlast+
floor must be
3
⁄8" wide and sealed prior to installing the
wall trim. The
3
⁄8" expansion space must be completely
filled with 3/8” compressible PE foam backer rod and
covered with 100% silicone sealant. Be sure the silicone
completely covers the expansion space from the edge of
the floor to the vertical surface, with no gaps or spaces.
Also apply a thin bead of silicone to the bottom portion of
the wall trim that will contact the laminate flooring surface
and wipe away any excess silicone after installing the wall
trim.
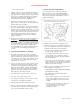
c. When Pergo Outlast+ flooring is installed in a bathroom
and an adjoining hall or room, a T-Molding must be
installed in the doorway between the rooms or hall-way
and the expansion space under the T-Molding must be
sealed. Fill the expansion space on both sides of the T-
Molding track with 3/8” compressible PE foam backer rod
and cover with 100% silicone sealant. Place backer rod
and silicone sealant in the expansion space of any
flooring transition in the doorway of a bathroom. Also
apply a thin bead of silicone to the bottom portion of the
transition that will contact the laminate flooring surface
and wipe away any excess silicone after installing the
transition.
d. Pergo Outlast+ must not be installed in rooms with a floor
drain.
e. Pergo Outlast+ must not be installed over any floor that
has a sump pump — i.e. should there be a bathroom at a
below grade level or on-grade concrete slab in the home
and a sump pump is located on that below grade level
flooring or on the on-grade level subfloor, then Pergo
Outlast+ flooring cannot be installed anywhere on that
floor.
f. Wipe up liquids immediately. Do not allow topical
moisture to remain on the floor for longer than
necessary.