
Installation Guide
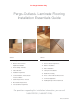

For Pergo Outlast+ Only
Revised: 3-Jan-2018
1. FLOATING FLOOR - Pergo Outlast+ is designed to be
installed as a floating
fl
oor — thus it is not nailed or glued to
the subfloor. Instead, planks are fastened together utilizing
unique tongues and grooves to create a durable, easy-to-
maintain floor surface. Because Pergo Outlast+ flooring
expands and contracts with temperature/humidity changes —
it is essential that a
3
⁄ 8" expansion space be left around the
floor’s perimeter. Depending your home’s subfloor type, you
may also be required to install a 6-mil. (.15mm) non-recycled
(100% virgin) resin polyethylene film as a vapor barrier
beneath your Pergo Outlast+ floor. Please refer to the
detailed installation instructions by subfloor type that follow.
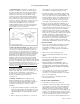
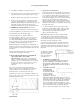
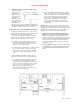
The illustrated example below shows proper installation of
the vapor barrier over a concrete subfloor.
2. WHAT YOU NE E D TO KNOW - Pergo Outlast+ flooring
consists of planks made from a durable laminate surface, a
wood based core and a balancing backing. The planks are
clicked together to form a long lasting, easy-to-maintain
surface. Like almost all materials in the home, Pergo Outlast+
flooring expands and contracts due to changes in temperature
and humidity. You should allow unopened cartons of Pergo
Outlast+ flooring to lay flat in the room where they will be
installed to acclimate for at least 48 hours before beginning
installation. If there is no time for acclimation, there should
be no more than a difference of 25° F and 20% relative humidity
between the stocking/transportation environment of the flooring
and the final installation environment of the flooring. A
3
⁄8"
expansion space must be left around the perimeter of the floor to
allow for movement. Failure to meet these requirements can
result in the floor buckling.
Pergo Outlast+ flooring is part of a complete flooring system
that includes a wide range of coordinating moldings and
transition strips designed to cover the
3
⁄8" expansion space at
the walls, doorways and transitions to other flooring.
Specialized tools, required to properly install Pergo Outlast+
flooring, are available at The Home Depot or at
homedepot.com.
3.
B
E FORE
STARTING -
Before beginning a Pergo
Outlast+ installation project, it is critical that you 1) fully
acquaint yourself with the detailed installation instructions for
your specific flooring and subfloor type and 2) conduct a
complete job site evaluation (see section 6, Job Site
Evaluation).
a. For appropriate installation information, review this guide
and the assembly instructions provided within each carton
of flooring you purchased. If you prefer speak to a person
regarding installation, call 1-800-33-PERGO (1-800-337-
3746).
b. Make a complete job site evaluation (see section 6, Job
Site Evaluation) to assure that environmental conditions
are acceptable for installing Pergo Outlast+ flooring.
c. Determine the quantity of Pergo Outlast+ planks, flooring
transitions and wall trim needed for your installation. Add
10% to your square footage for standard installations. For
diagonal installations, add 15%. Depending on the type of
room and the type of subfloor you are working with, you
may also need glue and a 6 mil (.15mm) non-recycled
(100% virgin) resin polyethylene film as a vapor barrier.
d. Make sure you have the appropriate installation tools, an
installation kit and additional spacers (used to maintain
expansion space). For Pergo Outlast+ you will also need 3/8”
compressible PE foam backer rod and clear 100% silicone
sealant to properly seal the perimeter of the installation.
e. Acclimation — Allow unopened cartons of Pergo Outlast+
planks to lay flat in the room where they will be installed for
at least 48 hours, depending upon climate, before beginning
installation. During this time, the planks adjust to the
specific temperature and humidity conditions of the room. If
there is no time for acclimation, there should be no more
than a difference of 25° F and 20% relative humidity
between the stocking/transportation environment of the
flooring and the final installation environment of the flooring.
4. A BASIC OVERVIEW
a. Remove any existing quarter round molding. The existing
quarter round can be repainted and installed after the
Pergo Outlast+ installation or you can select a new,
prefinished, color-coordinated quarter round available at
your retailer.
b. Always remove carpet, pad and tack strips.
c. Remove wood flooring if it is installed over a concrete
subfloor.
d. Be sure the surface of the subfloor is flat, clean, dry
and sound before starting. (Refer to Subfloor
Requirements Sections 7, 8, 9, 10, & 11.)
e. On concrete subfloors, use Pergo Moisturbloc
™
, a non-
recycled 6-mil. (.15mm) non-recycled (100% virgin) resin
polyethylene film as a vapor barrier, overlapping edges
8", or follow the directions for installation of an equivalent
vapor barrier.
f. Foam underlayment is pre-attached to Pergo Outlast+.
No additional underlayment is required for proper
performance. Do not install Pergo Outlast+ over multiple
layers of foam underlayment.
g. Inspect every plank for any shipping damage when
removing from the carton.
5.
INSTALLATION
R
E QUIREM E N
T
S
a. Pergo Outlast+ is intended only for indoor use.
b. Acclimation — Allow the Pergo Outlast+ planks to lay flat in
unopened cartons, at least two feet from walls where they
will be installed, for at least 48 hours before starting the
installation. In very dry or very humid climates, allow 96
hours (4 days). For acclimation, the relative humidity should
be 35-65%. The temperature should be 60-85°F for product
acclimation, as well as during and after installation. If there is
no time for acclimation, there should be no more than a
difference of 25° F and 20% relative humidity between the