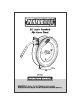
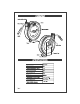
LIRA | mete tg 25' Auto Rewind Afr Hose Reel 275122 A —— OPERATORS MANUAL Al lb Reduce The In er Inc i ave eructation tu
TABLE OF CONTENTS Befoul Gauchos ovens ies sans son an ss ves is sas ans vss ss vans vs sss oid. Woodcarving —— Assembly uw. Replacement parts Limited Warranty ‘Thank you very much for choosing a PERFORATE. product. For future referrers, pleats complete the owns record below: Serial Humberto Dee Code: Purchase Dubhe: Have the receipt, warranty and these Instructions.
SAFETY INSTRUCTIONS The purposes of safety symbols is fo mi tract our &intention fo possible dangers. The safely symbols, and the explanations with them, deserve your careful attention and understanding. The symbol warnings do not by themselves eliminate any danger The instructions and warnings they give are no substitutes for proper accident prevention measures.
SAFETY INSTRUCTIONS IMPORTANT SAFETY CONSIDERATIONS . Fahd ara understand all Instructions. Falls to follow al Instructions may result in serious Injury. 2. The wakings, cations, and Instructions in this menus] cannot cover all possible conditions of situations that could occur. Exercise common sense and connubial when using the reel. Always be aware of tha environment sod ensure that the reel Is sad In a safe and responsible manner. 4.
SAFETY INSTRUCTIONS 1. Check for damaged perch before sate use, Carefully check they the res! will operate properly and perform iis intended function. Replace damaged or worm parts immediately. Mover operate the reel with damaged part. 2. Distraction the air or fluid supply from the ree! before making any adjustments, changing sororities, or siring the tool, Such preventive safety messieurs reduce ha rick of starting the fod accidentally.
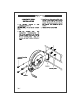
Lie 0 Tess rises incorporates medal forms fo ensurers strength and function equally wel in tithe braille and permanent-mount situations that are suitable for a variety of heavy-duty applications in the mining, construction, service, and marine Industries. The industrial-grads reels clouds: hose with & maximum 300 PS! working pressures, automatic rewind, and says installation on # wall, floor, or haling.
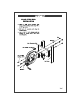
eng CONCRETE WALL INSTALLATION 1. Uses Mounting Template to mark Initialization holes for res Dn not dill nits concrete joints, 2 Drill four mounting holes. sa mandarins: recommendations for drill bit size depending on the sonnets mounting hardware you choose and drill the four mounting holes. Make sure anchors are rated fo hold 8 minimum of Fis. Lon orate Mounting Hardware Page? 3. install the two bottom anchors first.
WOOD STUD WALL INSTALLATION 1. Attach a 2x10 wood mounting plate across 2-2nd wetting shade using 1/8" x 21/27 lag sowers, 2 Drill holes for mounting reel using the temptation guide, &. Use 4 174" x 1 1/8" lavage bolts and washers to mount reel to the wood mounting plate.
ASSEMBLY WOOD CEILING JOIST INSTALLATION 1. Attach 2 20 wood mounting plate shore the 2-24 extincting joists using 174° ® 2-127 log screws as shown below, 2 Will holes for mounting reel using the template guides. 3 Usa » x 1 1/4" cartilage bolts and washers to mount real to the wood mounting plate.
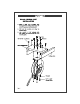
CONNECT THE HOSES 8, Apply Teflon taps or pips sealant to the supply hose threads Hen attach if to end fitting of the reels swivel (8) and tighten. If rot already connected, the pressurized supply hose can now be connected to the supply source. if the reel was supplied with hose beady wound on B, cording with step 13. If not, continue with the next top. 9. Turn the res] drum by hand until the rewind spring is tight, and drum hes latched.
OPERATING INSTRUCTIONS Check the res! for comets operation by slowly pulling out the hose. A olicking® noise will be heard every half revolution of Hh dram. To arch the res! pull out the hiss then few | to react after whoring the died, ‘second, thin, forth, ft, sin, slick" To unlucky the reel, slowly pull out the hose unt the clicking® knolls stops then, holding on to the hose, It Retest in a controlled way until the stop/block rests against the hose guidelines.
SPRING TENSION ADJUSTMENT [BARING Avoid assiduously phrasing theirs latching mechanism. Misunderstand tension and accidental release can cause a wildly spinning tool and personal Injury. ¥ necessary, stadium spring tension on rise by aiding or removing wraps of hose from spool, one wrap al a time, unt desired version is obtained. 1. Pull east approximately § or 8 fest of hose ard allow the drum to lech. 2. Remove hose bloodstock from the hiss ard pull the hose back Sough guided Mailers. 3.
. Pull cart all the old hose and lock the res Irs position. . Take not of the hose connection, any hose clamps, and the position of the stood block on the hose. 4. Ra move any hose clamps from the hose. 8. Carefully disconnect the hose from ie 8 a connection and remove it. . Route a new equivalent type and size has through unilateralism to the old hose commendation point. . Use Teflon tape or pipe sealant on the hose filing tweeds then screw it undo the connection Ming on the reel.
REE NO. | DESCRIPTION QTY | REF HO.
TROUBLESHOOTING ne es Sane Hose will not 1. Curtis nozzles, gn or 1. Add spring tension, fully retract tool is too heavy Hee Spring Tension 2. Spring Is fatigued Adjustment 5 2. Ads spring tension. 8 aed hose Bee Spring Tension Adamant” 3. Cell local distributor for correct hose length Hiss will not 1. Spring has lost 1. Reinstall spring tension bench at all wi venation oF hes . n possibly broken. 2. Apiece spring canister Final will nol aviator 1. incorrect Operation 1. Real latches on first 2.