
Use And Care Manual


13
MAINTENANCE
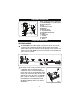
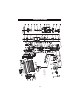
Fig.9
A
C
B
MAINTENANCE
CLEAN AND INSPECT BEFORE EACH USE
CAUTION: Disconnect tool from air supply before cleaning and
inspection. Correct all problems before putting the tool back in service.
Wipe tool clean and inspect for wear or damage. Use non-flammable
cleaning solutions to wipe exterior of tool only if necessary. Do not soak tool
with cleaning solutions. Such solutions can damage internal parts.
Inspect trigger and safety mechanism to assure system is complete and
functional: no loose or missing parts, no binding or sticking parts.
Keep all screws tight. Loose screws can cause personal injury or damage
the tool.
If the tool is used without an in-line oiler, place 2 drops of air tool oil into the
air inlet of the tool at the beginning of each workday and after about 1 hour
of continuous use. Frequent but not excessive lubrication is required for
best performance. Oil added through the airline connection will lubricate all
CAUTION: Such solutions may damage O-rings and other parts.
internal parts. Use only air tool oil. Do not use oil with detergents or other
additives. These can cause damage through accelerated wear to the seals
in the tool.
Use a small amount of oil on all exterior moving parts and pivots.
Dirt and water in the air supply are major causes of pneumatic tool wear.
See the section setup air source above for more information.
Keep tools clean for better and safer performance.Use non-flammable
cleaning solutions sparingly and only if necessary.Do not soak parts in the
solutions.
MAINTENANCE
5. Remove the jammed nail and ensuring the
slot of the nail magazine is free of nail rests.
6. Push the guide plate (C, Fig.9) back to the
nail magazine and hook the quick release
lever behind the both hooks (B, Fig.9) at the
nail magazine.
7. Push the clip (A, Fig.9 ) back to direction of
the nail magazine.
8. Ensure that the guide plate is fixed well
before the operating of the tool will be
continued.