
Use And Care Manual


12
3. Test fire a few fasteners into a sample piece of the material with which
you will be working, and check the depth of the fastener.
4. If the fastener is not driven deep enough, adjust the pressure regulator on
the air supply and increase the pressure. If the fastener is driven too deep,
adjust the pressure regulator on the air supply and decrease the pressure.
5. Repeat this adjustment until the desired depth is reached.
ADJUSTING THE DEPTH DRIVE
1. Test fire a few fasteners into a sample piece of the material with which
you will be working.
2. If the depth of drive needs to be changed, rotate the depth adjustment knob
3. Fire a few new fasteners to check if the accurate depth is reached.
4. Repeat this adjustment until the accurate depth is reached.
SEQUENTIAL FIRING
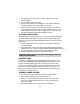
1. Disconnect tool from air supply before clearing a jammed fastener.
2. Open magazine and remove any remaining fasteners.
3. Grasp nose cover on both sides and pull the clip (A, Fig.9 ) of the quick
release lever outwards until the quick release lever is unhooked from
both hooks (B, Fig.9).
CLEARING A JAMMED FASTENER
4. Swing the guide plate (C, Fig.9) away from the nail magazine.
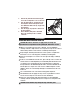
To operate a sequential firing tool, first position the No-Mar Tip (Fig. 1, C) on
the work surface WITHOUT PULLING THE TRIGGER(Fig.1, G). Depress the safety
nosepiece and then pull the trigger to fire a fastener. As long as the safety
nosepiece is contacting the work surface and is held depressed, the tool will
fire a fastener each time the trigger is depressed. If the safety nosepiece is
allowed to leave the work surface, the sequential firing described above must
be repeated to fire another fastener.
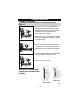
2. First setting the air pressure at 90PSI.
1. The operating air pressure of this tool is 70 to 110PSI. Do not exceed
maximum 120PSI.
The depth adjustment feature provides close control of the fastener drive depth;
from flush with the work surface to shallow or deep countersink. After the air
pressure is set, then use the depth adjustment knob (Fig.7) to give the accurate
depth of drive.
upward to increase; or rotate the depth adjustment knob downward to decrease.
NOTE: For different operations, you may need to adjust the air pressure
and depth adjustment knob.