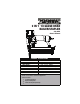
2 IN 1 18 GAUGE BRAD NAILER/STAPLER 208-0919 Owner’s Manual PRODUCT SPECIFICATIONS OPERATING PRESSURE: 70-110 PSI MAX PRESSURE: 120 PSI MAGAZINE CAPACITY: 100 PCS NAIL LENGTH : 5/8"~2"(15~50mm ) STAPLE LENGTH : 5/8"~ 1-5/8"(15~40mm ) NAIL TYPE: 18 GA -BRAD STAPLE TYPE: 18 GA -1/4"CROWN NAIL & STAPLE GAUGE: 18 GA AIR INLET : 1/4"(6mm) NPT Need Assistance? call us on our toll free customer support line: 1-866-915-8626 Technical questions Replacement parts Parts missing from package
TABLE OF CONTENTS Symbols …………..…………………………………………………… Page 2 Rules for safe operation& Important safety instructions ……………… Page 3-7 Carton contents …………..…………………………………………… Page 7 Functional description …..…………………………………………… Page 8 Operating procedures ………..…………………………………… Page 8-13 Maintenance …………..……………………………………………Page 13-14 Trouble shooting …………..………………………………………… Page 14 Parts list …………..………………………………………………… Page 15 Exploded view …………..…………………………………………… Page 16 Warranty …………..
IMPORTANT SAFETY INSTRUCTIONS INSTRUCTIONS PERTAINING TO A RISK OF FIRE, OR INJURY TO PERSONS. WARNING: When using tools, basic precautions should always be followed, including the following. WORK AREA Keep the work area clean and well lit. Cluttered benches and dark areas increase the risk of electric shock, fire, and injury to persons. Do not operate the tool in explosive atmospheres, such as in the presence of flammable liquids, gases, or dust.
Always assume that the tool contains fasteners. Do not point the tool toward yourself or anyone whether it contains fasteners or not. Wash hands after handling. This product or its power cord may contain WARNING: Do not firecancer a nail and on top of defects anotherornail. This may cause harm. the nail chemicals to cause birth other reproductive to be deflected and hit someone, or cause the tool to react which may result in a risk of injury to persons.
Do not use the tool as a hammer. Never use this tool in a manner that could cause a fastener to be directed toward anything other than the workpiece. Never use gasoline or other flammable liquids to clean the tool. Never use the tool in the presence of flammable liquids or gases. Vapours could ignite by a spark and cause an explosion which will result in death or serious personal injury. Do not remove, tamper with, or otherwise cause the trigger lock or trigger to become inoperable.
Do not use the tool if it leaks air or does not function properly. Do not operate the tool if it does not contain a legible warning label. TOOL SERVICE Use only accessories that are identified by the manufacturer for the specific tool model. When servicing a tool, use only identical replacement parts. Use only authorized parts. Use only the lubricants supplied with the tool or specified by the manufacturer. Tool service must be performed only by qualified repair personnel.
Do not use any type of reactive gases, including, but not limited to, oxygen carbon dioxide and combustible gases, as a power source. Use filtered, lubricated, regulated compressed air only. Use of a reactive gas instead of compressed air may cause the tool to explode which will cause death or serious personal injury. IMPORTANT SAFETY INSTRUCTIONS Use only a pressure-regulated compressed air source to limit the air pressure supplied to the tool. The regulated pressure must not exceed 110 PSI.
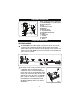
FUNCTIONAL DESCRIPTION K A Figure 1 names the major components of the PERFORMAX 2 in 1 nailer/stapler: A. Exhaust Deflector B. Body C. Quick Release Lever D. Magazine E. Magazine Latch F. 1/4” NPT Air Plug G. Depth Adjustment Konb H. Trigger I. No-Mar Tip J. Top Cap K. Hand Grip L. Safety F J B E H C L I G D Fig.1 OPERATING PROCEDURES SET UP AIR SOURCE The PERFORMAX 2 in 1 nailer/stapler is designed to operate on clean, dry, compressed air, regulated at 70-110 PSI.
Air fitting: The nailer is equipped with a ¼” NPT male industrial style plug.The plug can be connected to a ¼”Universal style female coupler.To prevent accidental firing,the air supply connection must not hold pressure when air supply is disconnected. If an incorrect fitting is used, the tool can remain charged with air after disconnecting and thus will be able to drive a fastener even after the air line is disconnected, possibly causing injury.
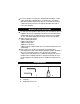
OPERATING PROCEDURES LOADING THE FASTENERS CAUTION: Do not load with contact safety mechanism or trigger depressed. Fig.4 Fig.5 1. Disconnect the tool to the air supply before loading fasteners to prevent fasteners from firing during connection. The fastener driving mechanism may cycle when the tool is connected to the air supply. 2. Depress the safe cover to release the movable magazine unit and pull the magazine out fully as shown in Fig.4. 3.
OPERATING THE TOOL CAUTION: Keep the tool pointed in a safe direction at all times. Never attempt to drive fasteners into materials too hard to penetrate, at too steep an angle, or too near the edge of the workpiece. The fastener can ricochet causing personal injury. Disconnect tool from air supply before doing any disassembly, maintenance, clearing a jammed fastener. Disconnect tool from air supply when leaving the work area, moving the tool to another location, or handing the tool to another person.
1. The operating air pressure of this tool is 70 to 110PSI. Do not exceed maximum 120PSI. 2. First setting the air pressure at 90PSI. 3. Test fire a few fasteners into a sample piece of the material with which you will be working, and check the depth of the fastener. 4. If the fastener is not driven deep enough, adjust the pressure regulator on the air supply and increase the pressure. If the fastener is driven too deep, adjust the pressure regulator on the air supply and decrease the pressure. 5.
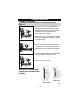
5. Remove the jammed nail and ensuring the slot of the nail magazine is free of nail rests. 6. Push the guide plate (C, Fig.9) back to the nail magazine and hook the quick release lever behind the both hooks (B, Fig.9) at the nail magazine. 7. Push the clip (A, Fig.9 ) back to direction of the nail magazine. 8. Ensure that the guide plate is fixed well before the operating of the tool will be continued. A C B Fig.
TROUBLESHOOTING PRO BLEM CAUSE SO LUTIO N Air leak at trigger area O-ring in trigger valve damaged or cracked Trigger valve head damaged Trigger valve stem, seal, or O-ring damaged Air leak between body Piston O-ring or bumper and front plate damaged Air leak between body Screw loose and cylinder cap Damaged seal Tool driving fasteners Worn bumper too deeply Air pressure too high Tool runs slowly or has Insufficient Iubrication power loss Insufficient air supply Broken spring in cylinder cap Exhaust port
PARTS LIST WARNING: When servicing, use only original equipment replacement parts. The use of any other parts may create a safety hazard or cause damage to the trim router. Any attempt to repair or replace spare parts on this finish nailer may create a safety hazard unless repairs are performed by a qualified technician. For more information, call the toll-free helpline, at 1-866-915-8626. Part No. Description Part No.
SCHEMATIC DRAWING Issue Date:2016.1.4 Version No.
TM PERFORMAX 18 GAUGE BRAD NAILER/STAPLER WARRANTY 30-DAY MONEY BACK GUARANTEE:: This PERFORMAXTM brand power tool carries our 30-Day Money Back Guarantee. If you are not completely satisfied with your PERFORMAX TM brand power tool for any reason within thirty (30) days from the date of purchase, return the tool with your original receipt to any MENARDS ® retail store, and we will provide you a refund – no questions asked.