Assembly Instructions Item # 245-1879 Model # M72MWC13BLK USE AND CARE GUIDE 72IN 13-DRAWER WITH 2 DOOR WORKBENCH WITH SOLID WOOD TOP Questions, problems, missing parts? Before returning to the store, call 1-866-441-5080 9 a.m – 6 p.m.
Table of Contents Table of Contents .................................................. 2 Assembly ............................................................... 6 Safety Information ............................................... 2 Operation .................................... .......................... 7 Warranty ................................................................ 4 Cordless Power Tool Battery Chargers ............... 8 Specifications ...................................................
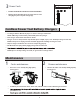
7. Extension cord □ Follow all manufacturers' Warnings and Operating Instructions for your extension cord. □ Do not insert extension cord through hole without grommet in place. □ Only use a three-wire extension cord with all three prongs intact. Never remove the round grounding prong. □ Extension cord must be connected to a 125 Volt GFCI protected outlet with proper ground. If GFCI outlet is not available, use an extension cord with GFCI protection built in.
Limited Lifetime Warranty PERFORMAX® Tool Cabinets and Chests are warranted to be free from defects in materials and workmanship under normal use for the lifetime that you own the product. If any part of the product is found to be defective during normal use, the defective product or part will be replaced at our discretion. This warranty does not cover products that are damaged through accident, abuse, misuse, commercial/industrial applications or neglect.
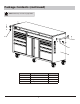
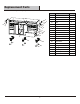
Package Contents (continued) NOTE: Cabinet Keys are inside top right drawer.
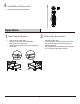
Assembly CAUTION: Two people are recommended for assembly. 1 Attaching the cabinet handle □ Position the cabinet handle (B) over the holes on the cabinet (A). □ Attach with the bolts (AA) and tighten with supplied hex key (BB). □ Repeat this process on the opposite side of cabinet (A). AA B A NOTE: The holes in the cabinet are tapped and do not require nuts. 3 Attaching the bottle opener 2 Attaching the storage hook □ Position the storage hook (C) over the holes on the cabinet (A).
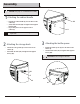
4 Installation of Power Cord □ Gently pull cord plug through grommet. Operation 1 Removing the drawers □ □ □ 2 Re-inserting the drawers □ □ Fully extend the empty drawer. Push up the one release lever while pulling down on the other release lever. Pull the drawer outward until it is released from the drawer slide. □ 7 Extend the drawer slides. Insert the brackets on each side of the drawer into the slots in the slides, being careful that they are properly positioned.
3 Power Cords □ BE SURE TO FOLLOW ALL ELECTRICAL SAFETY PRECAUTIONS. □ Warning: Do Not forcefully pull on the power cords to avoid damaging the power strip and causing injury. Cordless Power Tool Battery Chargers □ See Charger’s Owner’s Manual for proper use and care of charger and batteries. Follow all Warnings and Instructions provided with your battery charger. □ Place chargers and electrical connections in cabinet. □ Chargers are for use in dry locations only.
Replacement Parts For assistance with replacement parts please call 1-866-441-5080.