
Use And Care Manual

17
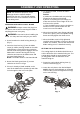
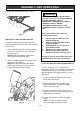
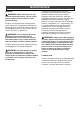
Fig. 9
1
2
3
GENERAL CUTTING – cont’d
WARNING: Do not force the circular saw.
Use only enough force to keep the blade cutting
at full speed. Excessive pressure on the blade
will cause it to slow down and overheat,
resulting in poor cut quality and damage to the
motor.
9. Turn laser OFF.
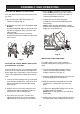
PLUNGE CUTTING
WARNING: To avoid loss of control,
damage to the blade or damage to the
workpiece, always use extreme caution when
making plunge cuts. It is not recommended to
plunge cut any material other than wood.
1. To plunge cut inside the edges of a
workpiece, clearly mark the cutting line on the
workpiece.
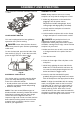
2. Set the depth (Fig. 2) and set the bevel angle
at 0° (Fig. 3).
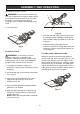
3. Set the saw on the workpiece so the front
edge of the sole plate (1) is flat on the
workpiece (Fig. 10).
4. Open the blade guard by rotating the blade
guard lever (2) forward.
5. Align the saw blade with the cutting line (3)
using the 0° cutting mark on the sole plate
and the laser line.
NOTE: Make sure the saw blade is inside the
area to be cut out.
6. Start the saw and slowly lower the blade onto
the workpiece while holding the blade guard
lever forward to allow the blade to cut into the
workpiece.
7. Continue lowering the blade into the
workpiece until the full cutting depth has been
achieved. Continue sawing and complete the
cut as required.
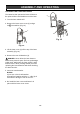
CUTTING USING THE EDGE GUIDE
Whenever possible, install the edge guide on
the left hand side of the sole plate (Fig. 11). This
will place the majority of the tool weight on the
larger portion of the workpiece, making it easier
to control the tool. If necessary, the edge guide
may be installed from the opposite side, but the
edge guide mounting rod MUST engage both of
the edge guide slots in the sole plate.
!
!
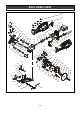
ASSEMBLY AND OPERATING
Fig. 10
1
2
3
Fig. 11