
Use And Care Manual

16
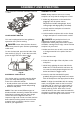
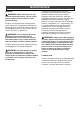
Fig. 8
1
2
Fig. 7
1
2
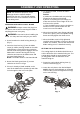
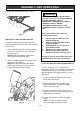
LOCK-OFF BUTTON AND TRIGGER SWITCH
– cont’d
LASER ON/OFF SWITCH
This saw is equipped with a laser guidance
system for more precise cutting.
DANGER: Never allow the laser beam to
shine into a person’s eyes. Serious eye damage
could result.
To turn the laser ON, press the left side of the
laser switch (1) (Fig. 8). To turn the laser OFF,
press the right side of the laser switch.
MATERIALS YOU CAN CUT
The circular saw is a versatile saw that allows
you to cut many different types of materials.
Some of the materials include:
Wood products such as lumber, hardwood,
plywood, composition board and paneling
Masonite and plastic
NOTE: There are several different types of
blades available. Generally, blades with carbide-
tipped teeth cut better and stay sharp longer.
Tooth count and configuration are also
important. High tooth counts cut slower and are
best suited for making smooth cuts on thinner
materials such as paneling. Use the correct
blade for your application.
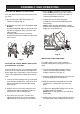
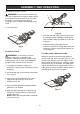
GENERAL CUTTING
NOTE: Always make a test cut on a scrap
workpiece to verify that all settings are correct.
1. Make any adjustments to the saw before
plugging it into the power source.
Adjustments include cutting depth, bevel
cutting angle and edge guide (if installed).
2. Clearly mark the workpiece to locate the
position of the cut.
3. Hold a smaller workpiece with a vise. Clamp
a larger workpiece to a work bench or table.
DANGER: Any workpiece that is not
adequately clamped in place or properly
supported for cutting may come loose or jamb
the blade, causing serious injury. Never hold the
workpiece in your hand.
4. Make sure there are no nails, screws, clamps
or foreign materials in the path of the saw
blade.
5. Turn the laser ON.
6. Place the front edge of the sole plate on the
workpiece.
7. While firmly gripping the saw, and with the
blade NOT in contact with the surface to be
cut, start the saw by depressing the lock-off
button and then the trigger switch.
8. Once the saw has reached full speed,
gradually bring the moving blade into contact
with the workpiece at the appropriate location.
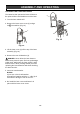
NOTE: To align the saw blade with the cutting
mark, use the guide marks on the front of the
sole plate (Fig. 9). Use the 0° cutting mark (1)
and the laser line (2) for right angle cuts. Use
the 45° mark (3) for 45° bevel cuts. The 45°
mark will allow for the extra material needed for
the angle cut. Always make a test cut on a scrap
workpiece before cutting the new material.
ASSEMBLY AND OPERATING
!
!