
Use And Care Manual

13
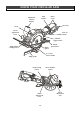
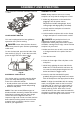
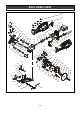
Fig. 1
1
2
3
4
5
6
REMOVING AND INSTALLING A BLADE
WARNING: Always remove the plug from
the power source before removing the blade or
adjusting the saw in any way.
WARNING: Use caution when handling the
blade. It is sharp and can easily cut your hand.
1. Press inward on the shaft locking button (1)
(Fig. 1).
2. Insert the 5mm hex key (2) into the blade
screw (3). While pressing inward on the shaft
locking button, rotate the hex key clockwise
until the shaft locking button engages with the
blade shaft. Continue turning the hex key
clockwise and remove the blade screw and
the outer blade flange (4).
NOTE: The blade screw is a left hand thread.
3. Rotate the blade guard lever (5) counter
clockwise as far as it will go.
4. If there is already a blade installed on the
saw, lift the blade off the spindle (6) and slide
it out through the slot in the sole plate.
5. To reinstall a blade, reverse the above
procedure.
NOTES:
a) Make sure the blade teeth are pointing
forward at the bottom of the blade.
b) When re-installing the outer flange nut
make sure the flats of the flange nut fit over
the flats on the spindle.
c) Turn the blade screw counter clockwise to
thread it into the spindle. Make sure the
screw is not cross threaded.
6. When the new blade, outer flange and blade
screw are in place, press the spindle locking
button and fully tighten the blade screw.
7. When the blade screw is fully tightened,
carefully rotate the blade to ensure it does not
wobble. If it wobbles, remove and reinstall the
blade making sure it is installed correctly.
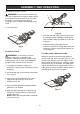
SETTING THE CUTTING DEPTH
The cutting depth of the blade should be set to
suit the thickness of the material being cut. The
cutting depth should be approximately 1/8"
(3 mm) greater than the thickness of the
material being cut.
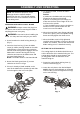
1. Rotate the cutting depth locking lever (1)
counter clockwise (Fig. 2).
2. Lower the sole plate to the desired depth.
NOTE: Align the desired depth on the depth
control scale (2) with the alignment mark (3)
on the saw housing.
ASSEMBLY AND OPERATING
!
!
Fig. 2
1
2
3
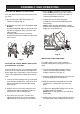
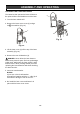
NOTE: For illustrative purposes, some
drawings show the vacuum adaptor
installed on the saw. The vacuum adaptor
does NOT have to be installed if a vacuum
is not being used.