
Datasheet

Ultrasonic sensor UB2000-F42-E6-V15
3
Release date: 2016-08-01 13:41 Date of issue: 2016-08-01 133988_eng.xml
Germany: +49 621 776 4411Pepperl+Fuchs Group
Refer to “General Notes Relating to Pepperl+Fuchs Product Information”.
USA: +1 330 486 0001 Singapore: +65 6779 9091
www.pepperl-fuchs.com fa-info@us.pepperl-fuchs.com fa-info@sg.pepperl-fuchs.com
fa-info@de.pepperl-fuchs.com
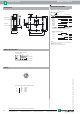
Functional description
The sensor can be completely parameterised using 2 keys on the side of the housing. One special feature of this sensor is the
option of adapting the ultrasonic beam width to the ambient conditions at the place where the sensor is used.
Teach-in of switching points:
Teach-in of switching points is used to determine the points at which the switching outputs will change their state. In addition,
the order of switching points A1 < A2, or A1 > A2 also determines the effective direction (normally closed/open function) of the
window in the output function (operating mode) "Window + Switching point“ (see below).
The process for Teach-in of switching point A2 is similar to what was described above, using key A2.
Special feature for output function "Window + switching point“
In the case of the output function (operating mode) "Window + switching point“ (see below), switching points A1 and A2 define
the window limits of switch output 1.
A third switching point A3 can also be defined here at which switch output 2 switches.
Teach-in for switching points can only be performed within the first 5 minutes after turning on the power supply. If the switching
points need to be changed at a later time, this cannot be done until there is a new Power On.
Parameter assignment of the output function and ultrasound beam width
If you press the A1 key while the power supply is being turned on and then hold it down for 1 second, the sensor goes into the
two-level parameterisation of operating modes.
Level 1, parametrisation of the output function
Pressing the A2 key briefly will cause the possible output functions to be selected one after the other (depending on the last
output function to be parameterised). The functions are indicated by a flashing sequence of the green LED.
Accessories
MH 04-3505
Mounting aid for FP and F42 sensors
MHW 11
Mounting brackets for sensors
V15-G-2M-PVC
Female cordset, M12, 5-pin, PVC cable
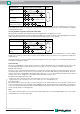
Teach-in of switching point A1 with key A1
Press key A1 > 2 seconds The sensor goes into learning mode for switching point
A1
Position the target object at
the desired distance
The sensor indicates by rapid flashing of the yellow
LED that the target object has been detected. If no ob-
ject is detected, the red LED flashes.
Press key A1 briefly The sensor completes the Teach-in process for switch-
ing point A1 and stores the value in permanent memo-
ry. If the object is uncertain (red LED lit irregularly) the
Teach-in value is not valid. Teach-in mode closes.
Teach-in of switching point A3 with keys A1 and A2
(only for operating mode window + switching point, see below)
Press key A1 + A2 > 2 sec-
onds
The sensor goes into learning mode for switching point
A3
Position the target object at
the desired distance
The sensor indicates by rapid flashing of the yellow
LEDs that the target object has been detected. If no ob-
ject is detected, the red LED flashes.
Press key A1 briefly
(output 2: normally closed)
or
Press key A2 briefly
(output 2: normally open)
The sensor completes the Teach-in process for switch-
ing point A3 and stores the value in permanent memo-
ry.
If the object is uncertain (red LED lit irregularly) the
Teach-in value is not valid. Teach-in mode closes.