
Operation Manual


Table Of Contents
- Using Your Camera Safely
- Care to be Taken During Handling
- Contents
- Composition of the Operating Manual
- Camera Features
- 1 Getting Started
- 2 Common Operations
- 3 Taking Pictures
- Taking Still Pictures
- Taking Pictures
- Setting the Shooting Mode
- Using the Face Detection Function
- Taking Pictures Automatically (Auto Picture Mode)
- Taking Pictures in the Custom Settings (Program Mode)
- Taking Pictures in the Basic Mode (Green Mode)
- Using the Zoom
- Taking Pictures of Dark Scenes (Night Scene/Night Scene Portrait/Digital SR/Fireworks/Candlelight Mode)
- Taking Pictures of People (Portrait/Natural Skin Tone Mode)
- Taking Pictures of Children (Kids Mode)
- Taking Pictures of Your Pet (Pet Mode)
- Taking Pictures of Sports and Leisure Activities (Sport/Surf & Snow Mode)
- Framing Your Pictures (Frame Composite Mode)
- Taking Pictures Indoors (Party Mode)
- Taking Pictures of Text (Text Mode)
- Taking Pictures Using the Miniature/HDR Filter
- Using the Camera’s Self-timer
- Taking a Series of Pictures (Continuous Shooting/Burst Shooting Mode)
- Taking Pictures Using the Remote Control Unit (Optional)
- Setting the Shooting Functions
- Selecting the Flash Mode
- Selecting the Focus Mode
- Selecting the Number of Recorded Pixels
- Compensating for Exposure (EV Compensation)
- Correcting the Brightness (D-Range Setting)
- Adjusting the White Balance
- Setting the AE Metering
- Setting the Sensitivity
- Switching the Face Detection Function
- Setting the Shake Reduction Function
- Setting the Instant Review
- Setting the Image Sharpness (Sharpness)
- Setting the Color Saturation (Saturation)
- Setting the Image Contrast (Contrast)
- Setting the Date Imprint Function
- Calling Up a Specific Function
- Recording Movies
- Saving the Settings (Memory)
- Taking Still Pictures
- 4 Playing Back and Deleting Images
- 5 Editing and Printing Images
- 6 Recording and Playing Back Sound
- 7 Settings
- Camera Settings
- Formatting an SD Memory Card
- Changing the Sound Settings
- Changing the Date and Time
- Setting the World Time
- Changing the Display Language
- Changing the Naming System of the Folder
- Changing the Video Output Format
- Adjusting the Brightness of the Display
- Using the Power Saving Function
- Setting the Auto Power Off Function
- Changing the Start-up Screen
- Correcting Defective Pixels in the CCD Sensor (Pixel Mapping)
- Resetting to Default Settings (Reset)
- Camera Settings
- 8 Connecting to a Computer
- 9 Appendix
138
5
Editing and Printing Images
4
Press the 4 button.
The cropping screen appears.
The largest size of cropped image is shown with a green frame on the
screen. The cropped image cannot be larger than this cropping frame size.
5
Choose the cropping area.
Change the size and/or position of the
cropping frame by the following operations.
6
Press the 4 button.
The cropped image is saved with a new file name.
The number of recorded pixels is selected automatically according to
the size of the cropped image.
This function lets you perform special processing on the selected image.
1
In Q mode, use the four-way controller (45) to
choose the image you want to edit.
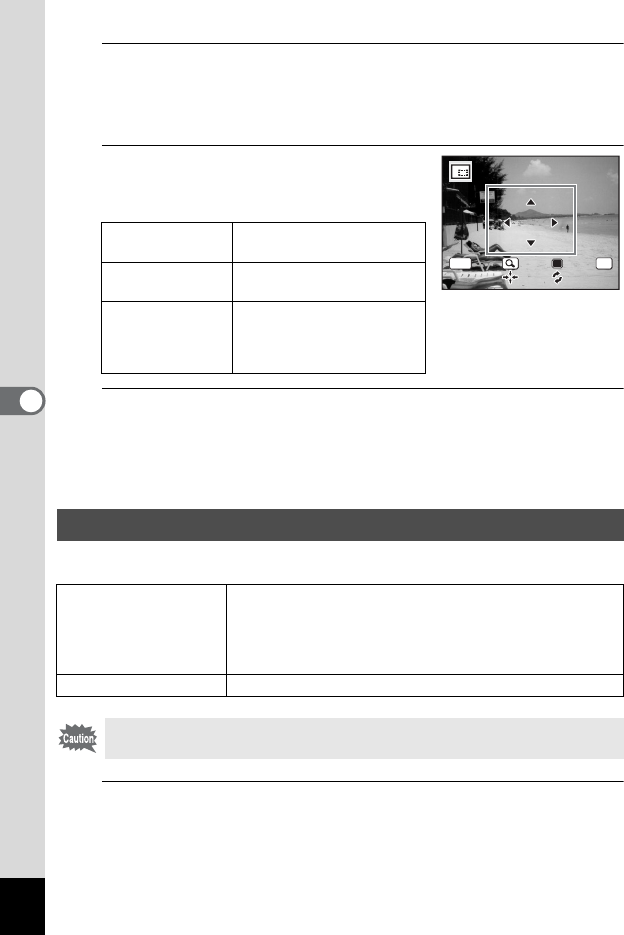
Zoom button Changes the size of the
cropping frame.
Four-way controller
(
2345
)
Moves the cropping frame
up, down, left and right.
Green button Rotates the cropping frame.
•
The button is displayed only
when the cropping frame
can be rotated.
Processing Images with the Miniature/HDR Filter
o Miniature Filter
Processes the subjects in the images to look like miniature
objects.
The processed image is saved with the recorded pixels of
f (2592×1944). Images of size f or smaller cannot be
processed.
p HDR Filter Processes image into HDR-like image.
Movies and images taken with another camera cannot be processed
using the Miniature/HDR Filter function.
OKMENU
C a n c el
Cancel OK
O K
OK