
Operation Manual


Table Of Contents
- Using Your Camera Safely
- Care to be Taken During Handling
- Contents
- Composition of the Operating Manual
- Camera Features
- 1 Getting Started
- 2 Common Operations
- 3 Taking Pictures
- Taking Still Pictures
- Taking Pictures
- Setting the Shooting Mode
- Using the Face Detection Function
- Taking Pictures Automatically (Auto Picture Mode)
- Taking Pictures in the Custom Settings (Program Mode)
- Taking Pictures in the Basic Mode (Green Mode)
- Using the Zoom
- Taking Pictures of Dark Scenes (Night Scene/Night Scene Portrait/Digital SR/Fireworks/Candlelight Mode)
- Taking Pictures of People (Portrait/Natural Skin Tone Mode)
- Taking Pictures of Children (Kids Mode)
- Taking Pictures of Your Pet (Pet Mode)
- Taking Pictures of Sports and Leisure Activities (Sport/Surf & Snow Mode)
- Framing Your Pictures (Frame Composite Mode)
- Taking Pictures Indoors (Party Mode)
- Taking Pictures of Text (Text Mode)
- Taking Pictures Using the Miniature/HDR Filter
- Using the Camera’s Self-timer
- Taking a Series of Pictures (Continuous Shooting/Burst Shooting Mode)
- Taking Pictures Using the Remote Control Unit (Optional)
- Setting the Shooting Functions
- Selecting the Flash Mode
- Selecting the Focus Mode
- Selecting the Number of Recorded Pixels
- Compensating for Exposure (EV Compensation)
- Correcting the Brightness (D-Range Setting)
- Adjusting the White Balance
- Setting the AE Metering
- Setting the Sensitivity
- Switching the Face Detection Function
- Setting the Shake Reduction Function
- Setting the Instant Review
- Setting the Image Sharpness (Sharpness)
- Setting the Color Saturation (Saturation)
- Setting the Image Contrast (Contrast)
- Setting the Date Imprint Function
- Calling Up a Specific Function
- Recording Movies
- Saving the Settings (Memory)
- Taking Still Pictures
- 4 Playing Back and Deleting Images
- 5 Editing and Printing Images
- 6 Recording and Playing Back Sound
- 7 Settings
- Camera Settings
- Formatting an SD Memory Card
- Changing the Sound Settings
- Changing the Date and Time
- Setting the World Time
- Changing the Display Language
- Changing the Naming System of the Folder
- Changing the Video Output Format
- Adjusting the Brightness of the Display
- Using the Power Saving Function
- Setting the Auto Power Off Function
- Changing the Start-up Screen
- Correcting Defective Pixels in the CCD Sensor (Pixel Mapping)
- Resetting to Default Settings (Reset)
- Camera Settings
- 8 Connecting to a Computer
- 9 Appendix
111
3
Taking Pictures
You can choose from the following recorded pixels and frame rate
settings for movies.
The more pixels there are, the clearer the details and the bigger the file
size. The more frames per second, the better the quality of the movie,
but the file size becomes larger.
* The frame rate (fps) indicates the number of frames per second.
1
Press the 3 button in A mode.
The [A Rec. Mode] menu appears.
2
Press the four-way controller (5) or zoom button
towards the right (y).
The [C Movie] menu appears.
3
Use the four-way controller (23) to select [Recorded
Pixels].
4
Press the four-way controller (5).
A pull-down menu appears.
Selecting the Recorded Pixels and Frame Rate
for Movies
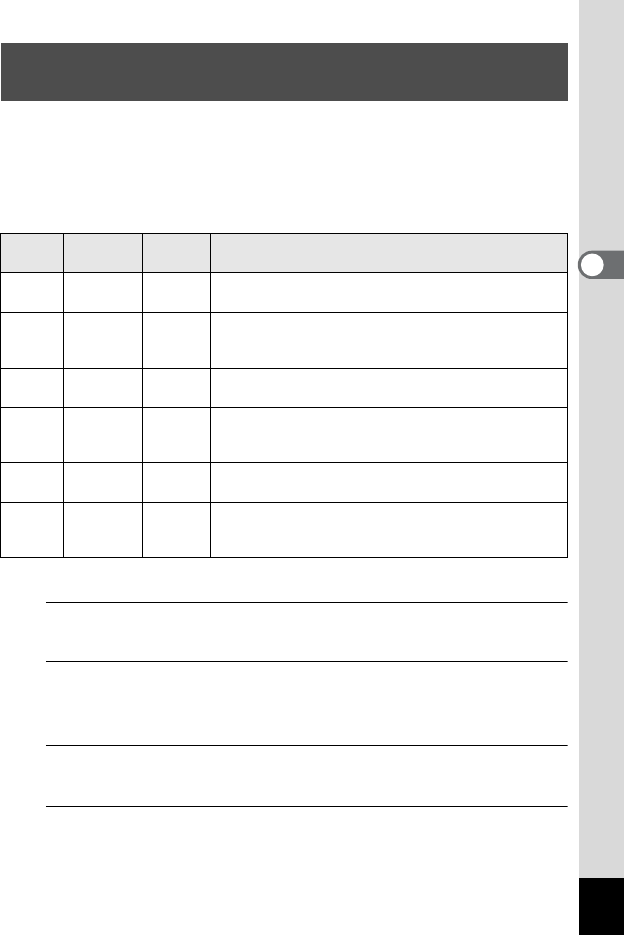
Setting
Recorded
Pixels
Frame
Rate
Use
M 1280×720 30 fps
Records images in HDTV format (16:9). Movement is
recorded smoothly. (default setting)
F 1280×720 15 fps
Records images in HDTV format (16:9). Increases
the total recording time by making the file size
smaller.
G 640×480 30 fps
Suitable for viewing on a TV or computer screen.
Movement is recorded smoothly.
H 640×480 15 fps
Suitable for viewing on a TV or computer screen.
Increases the total recording time by making the file
size smaller.
I 320×240 30 fps
Suitable for posting on a website or attaching to an
e-mail. Movement is recorded smoothly.
J 320×240 15 fps
Suitable for posting on a website or attaching to an
e-mail. Increases the total recording time by making
the file size smaller.