
Digital Camera Operating Manual Model Optio S60
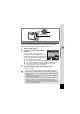
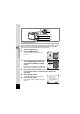
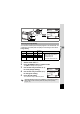

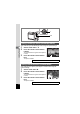
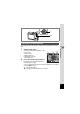
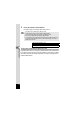
Table Of Contents
- FOR SAFE USE OF YOUR CAMERA
- Care to be Taken During Handling
- Contents
- Contents of the Operating Manual
- Checking the Contents of the Package
- Names of Parts
- Names of Operating Parts
- Getting Started
- Quick Start
- Common Operations
- Taking Pictures
- Taking Pictures
- Changing the Mode
- Selecting the Capture Mode
- Displaying Shooting Information in Capture Mode
- Taking Pictures in Auto Select Mode (Auto Select Mode)
- Letting the camera set the functions (Program Mode)
- Selecting the Picture Mode According to the Shooting Scene (Picture Mode)
- Taking Pictures of Dark Scenes (Night-Scene Mode)
- Taking Landscape Views (Landscape Mode)
- Taking Portrait Pictures (Portrait Mode)
- Taking Movies (Movie Mode)
- Using the Zoom
- Using the Self-Timer
- Continuous Shooting (Continuous Shooting Mode)
- Using the Remote Control Unit (optional)
- Taking Pictures with Color Filters (Digital Filter Mode)
- Taking Two-in-One Pictures (Two-in-One Mode)
- Taking Panorama Pictures (Panorama Assist Mode)
- Setting the Shooting Functions
- Selecting the Focus Mode
- Selecting the Flash Mode
- Selecting the Recorded Pixels
- Selecting the Quality Level
- Adjusting the White Balance
- Changing the Focusing Area
- Setting the Light Metering Mode to Determine the Exposure (AE Metering)
- Setting the Sensitivity
- Setting the Frame Rate
- Setting the Instant Review Time (Instant Review)
- Setting the Image Sharpness (Sharpness)
- Setting the Color Saturation (Saturation)
- Setting the Image Contrast (Contrast)
- Setting the Exposure (EV Compensation)
- Saving the Settings
- Taking Pictures
- Recording and Playback of Sound
- Playback/Deleting/Editing
- Settings
- Camera Settings
- Formatting an SD Memory Card or the Built-in Memory
- Changing the Sound Settings
- Changing the Date and Time
- Setting the World Time
- Changing the Start-up Screen, Background Color and Screen Effects
- Changing the Display Language
- Adjusting the Brightness of the LCD Monitor
- Changing the Video Output Format
- Changing the USB Connection Mode
- Setting Auto Power Off
- Resetting to Default Settings (Reset)
- Registering Functions
- Camera Settings
- Appendix

50
Taking Pictures
4
You can display the Help screen while taking or viewing pictures in Auto
Select mode. The Help screen describes the function of each button,
such as the four-way controller keys and zoom button.
1 Set the mode dial to -.
2 Press the 0 button.
The Help screen appears on the LCD
monitor.
3 Use the four-way controller (45)
to select [Mode Dial], [Four-way
Controller] or [Buttons on Back
Cover].
Only [Four-way Controller] and [Buttons on
Back Cover] are available in Playback mode.
4 Use the four-way controller (23)
to choose the button or mode that you want to be
explained.
5 Press the OK button.
The explanation of the button appears.
6 Press the OK button.
The camera is ready to take or play back
pictures.
Using the Help Function
1
2
5, 6
3, 4
?/Fn
OK
Exit
Mode Dial
Auto Select
More
?/Fn
OK
Four-way Controller
Right
Up
Left
OK Button
Down
Exit
More
This button changes
the Focus mode.
Exit
?/Fn
OK
OK
AF Macro Super macro
infinity Manual focus