
Operating Manual

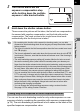

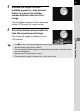


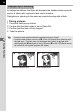
Table Of Contents
- FOR YOUR SAFETY
- PRECAUTIONS FOR BATTERY USAGE
- Handling the Camera
- CONTENTS
- Contents of this manual
- 1 Before using your camera
- 2 Getting Started
- 3 Basic Operation
- 4 Shooting Functions
- 5 Playback Functions
- 6 Settings
- Setting Menu List
- How to Operate the Settings Menu
- Camera Settings
- Formatting a CF card
- Setting the Custom Functions
- Setting the Color Saturation
- Setting the Image Sharpness
- Setting the Contrast
- Setting the Instant Review
- Auto Power Off
- Turning the Beep On and Off
- Changing the Date Style and Date / Time
- Setting the World Time
- Setting the Display Language
- Selecting the Video Output Format
- Setting the LCD Monitor Brightness
- Resetting the File Number
- Setting the Slideshow
- Sensor Cleaning
- Resetting to Default Settings
- Custom Function Chart
- List of City Names
- 7 Connecting
- 8 Appendix
- More Details about Capture Functions
- Effect of Aperture and Shutter Speed
- Calculating flash distance from the aperture used (using built-in flash)
- Calculating aperture used from the flash distance (using the built-in flash)
- F, FA and FA J Lenses Compatibility with the Built-in Flash
- Setting the White Balance Manually
- FUNCTIONS AVAILABLE WITH VARIOUS LENS COMBINATIONS
- Optional Accessories
- Cleaning the CCD
- Precautions Regarding Memory Cards
- Error Messages
- Troubleshooting
- Main Specifications
- Glossary
- WARRANTY POLICY
- More Details about Capture Functions

83
Shooting Functions
4
3
Turn the Av dial to set the
exposure compensation step
while holding down the multiple
exposure / auto bracket button.
4
Hold down the shutter release button.
Three consecutive pictures will be taken, the first with no compensation,
the second with negative compensation, and the third with positive
compensation. The mode returns to the single-frame drive mode
automatically after the third picture is taken.
You can use the auto bracketing mode for only under-exposure or over-
exposure shots by combining the operation with exposure compensation
(p.79). The auto bracketing is performed in both cases on the basis of the
specified exposure compensation value.
• By combining this function with consecutive shooting mode, you can take
consecutive auto bracketing shots for as long as you keep the shutter release
button pressed.
• The focus is locked in the first frame position when the focus mode lever is set
to
l
(single).
• The focus is adjusted for each shot when the focus mode lever is set to
k
(continuous). However, note that the shutter will release even if the focusing is
not complete.
• The auto bracketing exposure setting will remain effective for twice as much
time as the metering timer (initial value 20 seconds) when you release your
finger from the shutter release button during auto bracketing, and you can take
the next picture at the next compensation step. In this case, auto focusing works
for each frame. After about twice as much time as the metering timer (initial
value 20 seconds), the camera returns to settings for taking the first picture.
• You can combine this function with the built-in flash or external flash (TTL and
P-TTL auto only) to change only the flash light output consecutively. However,
when using an external flash, holding the shutter release button down to take
three continuous frames may cause the second and third frame to be taken
before the flash is fully recharged. Always take one frame at a time after
confirming that charging is complete.
• You can change the auto bracketing sequence using a custom function.
See page 115 for setting Custom Functions.
Taking only over-exposed or under-exposed pictures