
Operating Manual


Table Of Contents
- FOR YOUR SAFETY
- PRECAUTIONS FOR BATTERY USAGE
- Handling the Camera
- CONTENTS
- Contents of this manual
- 1 Before using your camera
- 2 Getting Started
- 3 Basic Operation
- 4 Shooting Functions
- 5 Playback Functions
- 6 Settings
- Setting Menu List
- How to Operate the Settings Menu
- Camera Settings
- Formatting a CF card
- Setting the Custom Functions
- Setting the Color Saturation
- Setting the Image Sharpness
- Setting the Contrast
- Setting the Instant Review
- Auto Power Off
- Turning the Beep On and Off
- Changing the Date Style and Date / Time
- Setting the World Time
- Setting the Display Language
- Selecting the Video Output Format
- Setting the LCD Monitor Brightness
- Resetting the File Number
- Setting the Slideshow
- Sensor Cleaning
- Resetting to Default Settings
- Custom Function Chart
- List of City Names
- 7 Connecting
- 8 Appendix
- More Details about Capture Functions
- Effect of Aperture and Shutter Speed
- Calculating flash distance from the aperture used (using built-in flash)
- Calculating aperture used from the flash distance (using the built-in flash)
- F, FA and FA J Lenses Compatibility with the Built-in Flash
- Setting the White Balance Manually
- FUNCTIONS AVAILABLE WITH VARIOUS LENS COMBINATIONS
- Optional Accessories
- Cleaning the CCD
- Precautions Regarding Memory Cards
- Error Messages
- Troubleshooting
- Main Specifications
- Glossary
- WARRANTY POLICY
- More Details about Capture Functions
67
Shooting Functions
4
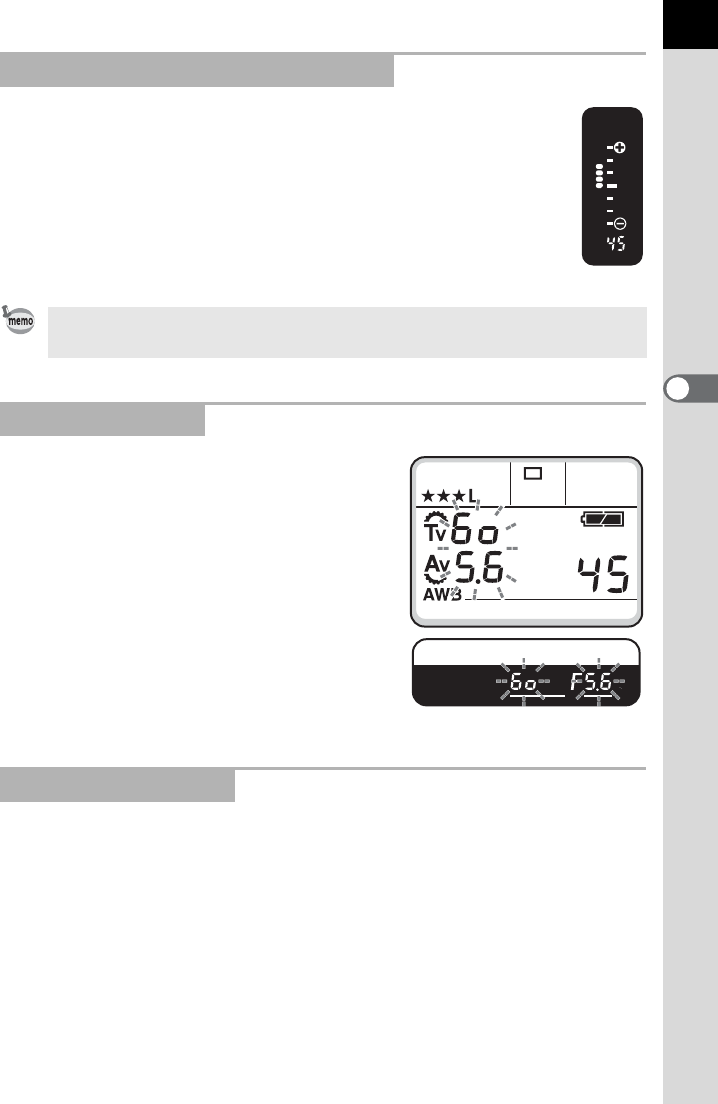
In a (Hyper manual exposure) mode, a bar graph appears in the
viewfinder. If the 9 are at the center of the bar, it indicates correct
exposure. If the 9 are on the negative end of the bar graph, it
indicates under exposure. If they are on the positive end, it
indicates over exposure. If the exposure setting exceeds the bar
graph display limit, the 7 or 8 will blink.
If the subject is too bright or too dark,
both the shutter speed and aperture
value will blink in the viewfinder and on
the LCD panel to indicate being out of
metering range. Adjusting the shutter
speed and aperture will not attain
proper exposure. Use an ND (Neutral
Density) filter or select a darker subject
if the subject is too bright. Select a
brighter subject or use a flash if it is too
dark.
You can use the AE-L button (p.69) to memorize the exposure value in
Hyper Manual mode. In this state, the shutter speed and aperture value
combination is changed, with the exposure value said as is, when you
change either the shutter speed or the aperture value.
Ex) If you press AE-L with the shutter speed set to 1/125 seconds and the
aperture set to f/5.6, using the Tv dial to change the shutter speed to
1/30 seconds will result in the aperture value automatically changing to
f11.
How to read the viewfinder bar graph
• The shutter speed and aperture value are displayed on the LCD panel
whenever the camera is on.
Exposure Warning
Combining with AE-L