Rev.
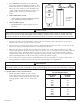
3. The "SM/SMBW" Series Filter has been listed and approved by the National Sanitation foundation. This booklet will enable you to install and operate your pool filter in the correct manner. Correct installation and operation will result in the trouble free operation of a quality product, as well as prevent unnecessary repairs. 4. Model SMBW Filter System U.S. Patent No. 4,414,109 4,328,833 a. Standard SM Series Filter with built-in backwash valve. Simplifies plumbing installations. 5.
SECTION II. FILTER INSTALLATION. A. GENERAL INFORMATION WARNING THIS FILTER OPERATES UNDER HIGH PRESSURE. WHEN ANY PART OF THE CIRCULATING SYSTEM, e.g., CLAMP, PUMP, FILTER, VALVE(S), ETC. IS SERVICED, AIR CAN ENTER THE SYSTEM AND BECOME PRESSURIZED. PRESSURIZED AIR CAN CAUSE THE LID TO BE BLOWN OFF WHICH CAN RESULT IN SEVERE INJURY, DEATH, OR PROPERTY DAMAGE. TO AVOID THIS POTENTIAL HAZARD, FOLLOW THESE INSTRUCTIONS. 1.
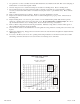
10. Provide space and lighting for routine maintenance access. Do not mount electrical controls over filter. Install electrical controls (e.g., on/off switches, timers, control systems, etc.) at least five (5) feet from the filter. This will allow you enough room to stand clear of the filter during system start up. 11. Allow sufficient clearance around the filter to permit visual verification that the clamp is properly installed around the tank flanges, see Figure 1. 12.
D. HOW TO CLEAN THE SEPARATION TANK, performed after each backwash operation. (If installed or if applicable.) The purpose of the separation tank is to collect the spent diatomaceous earth during backwashing (cleaning) of the filter. It must be cleaned after each backwash to prevent any clogging problems. It is recommended that this procedure be repeated to ensure complete backwashing of the filter. One backwashing may not be sufficient. Figure 3. 1. Open valve C and valve D* to drain separation tank.
7. Use garden hose to rinse down filter elements until all debris has been flushed from tank. Then screw drain plug on backwash line on models with Separation Tank. 8. Unscrew wing nut; remove washer and unclip air vent tube from holding wheel. Remove holding wheel. 9. Lift out filter elements and scrub each element with a soft brush. If elements are coated with scale, it will be necessary to brush with a mild solution of muriatic acid (10 parts water to 1 part muriatic acid). Rinse elements with water. 10.
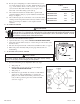
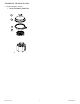
SECTION III. TECHNICAL DATA A. REPLACEMENT PARTS 1. Model SM 1000 & 2000 Filter 1 2 3 4 Rev.
A. REPLACEMENT PARTS, contd. 3. Rotary Valve Model SMBW w/Noryl Rotor P/N 075122 8 Rev.
SECTION IV. MAINTENANCE-TROUBLE SHOOTING A. Before performing any of the recommended actions below, it is important to consult the instruction manual including all warnings. SYMPTOMS WHAT TO LOOK FOR RECOMMENDED ACTION Earth (D.E.) To Pool Internal parts not assembled correctly. NOTE: Be sure the foreign material in the pool is diatomaceous earth. Check assembly of internal parts making sure they are correctly in place. Damaged manifold. Replace manifold. Torn element fabric.
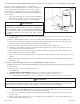
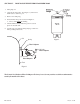
SECTION V. HOW TO USE THE FILTER LID OPENER TOOL 1. Turn pump off. 2. Open the air relief valve. (See Figure 1.) and wait for thank water to drain into pool. 3. Remove the clamp ring. 4. Insert the filter lid opener as shown in Figure 2. a. The tool fits under the O-Ring. 5. Lift the tank lid with the filter lid opener in several places around the tank. 6. Consult page 5 for filter cleaning and page 3 and 4 for filter operating instructions. Lid Figure 1.
SM SERIES FILTER LIMITED WARRANTY Your SM Series filter is a quality product of Pentair Pool Products which warrants that it is fit for the ordinary purposes for which such equipment is used, is adequately contained, packaged and labeled, and conforms to the representations made on the container or label. This warranty only applies to the original purchaser.