
User's Manual

8
EasyTouch Wireless Control Panel Installation and User’s Guide
Installing batteries (Continued)
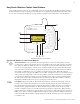
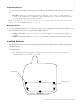
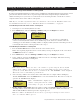
2. Load the four batteries into the battery compartment. Orient the positive polarity end of each battery
as shown below.
3
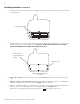
. Install the battery cover and secure with the six screws. Make sure that the battery cover is secure
and that all the screws are hand tightened.
CAUTION - DO NOT OVER TIGHTEN THE SCREWS.
OVER TIGHTENING THE SCREWS CAN DAMAGE THE UNIT.
4. Power up the unit: To switch the unit on, press the Power On button located on the front of the
unit.
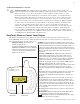
5. Display messages after replacing batteries: After replacing depleted batteries a check battery
message is displayed on the screen. Press the
MENU button to continue.
6. The screen will then display a second message to check the battery cover. After checking that the
battery cover is secure and that all screws are tightened, press the
MENU button.
The battery icon should display the fully charged icon ( ). The unit is ready for use.
(+) positive polarity
Secure battery
cover with the six
screws
Easy Touch Control Panel
(rear view)
Battery cover