
Operation Manual


Cerberus Wi-Fi Lite (P6381-0)
39
Set Security – Click Set Security to display a screen to configure WDS security settings.
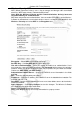
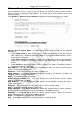
Current WDS AP List – This table displays the list of wireless APs participating in this WDS.
MAC Address – This field displays the MAC address of the wireless AP in this WDS.
Comment – This field displays the description for this setting.
Select – Select this option to delete the wireless AP.
Delete Selected – Click Delete Selected to delete the selected wireless AP(s). When you
click this button, a warning screen displays. Click OK to continue.
Delete All – Click Delete All to remove all wireless AP(s). When you click this button, a
warning screen displays. Click OK to continue.
Reset – Click Reset to clear the Select check box(es).
Help – Click Help to display on-line help information in a pop-up screen.
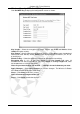
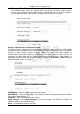
Wireless: WDS: Set Security
You can set the security settings for the WDS in the WDS Security Setup screen.
Note: You must set the same encryption method and key in the same WDS.
Encryption – Select the encryption method in this field.
WEP Key Format – Specify how you want to enter the keys. Select Hex to enter hexadecimal
format (that starts with 0x). Select ASCII to enter alphanumerical characters (a-z, A-Z, 0-9) for
the keys.
WEP Key – If you select 64-bit in the Key Length field, enter 10 hexadecimal or 5 ASCII
characters. If you select 128-bit in the Key Length field, enter 26 hexadecimal or 13 ASCII
characters.
Note: As you enter the keys, an asterisk “*” displays for each character you enter.
Pre-Shared Key Format – Specify how you want to enter the keys. Select Hex to enter
hexadecimal format (that starts with 0x). Select ASCII to enter alphanumerical characters (a-z,
A-Z, 0-9) for the keys.
Pre-Shared Key – Enter between 8 to 32 characters for the pre-shared key.
Note :All wireless devices in the same wireless network must use the same pre-shared
key.
Apply Changes – Click Apply Changes to save the changes. The Wireless-G Router will
reboot to make the changes take effect.
Close – Click Close to close this screen.
Note: All unsaved changes will be lost.