
Operation Manual


Cerberus Wi-Fi Lite (P6381-0)
37
Wireless: Wireless Access Control
Use the Wireless Access Control to set the Wireless-G Router to allow or block wireless
access based on a computer’s MAC address. This allows you to restrict wireless access and
increase security.
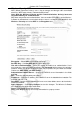
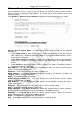
Click Wireless > Wireless Access Control to display the configuration screen as shown.
Wireless Access Control Mode – Set the access control action to apply on the specified
computer(s).
• Select Allow Listed to grant wireless access to only the computer(s) with the specified
MAC address(es). Computers with MAC address not listed are blocked wireless access
to the Wireless-G Router.
• Select Deny Listed to block wireless access to the computer(s) with the specified MAC
address(es). Computers with MAC addresses not listed below are allowed wireless
access.
• Select Disable to deactivate wireless access control. This allows all computers wireless
access to the Wireless-G Router.
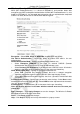
MAC Address – Enter the MAC address of a computer on which you want to restrict wireless
access. For example, 0023f6378a1.
Comment – Enter a description for this access control rule.
Apply Changes – Click Apply Changes to save the changes. The Wireless-G Router will
reboot to make the changes take effect.
Reset – Click Reset to undo the changes.
Current Access Control List – This table displays the current wireless access control
settings on the Wireless-G Router.
MAC Address – This field displays the MAC address of the computer to which this access
control setting applies.
Comment – This field displays the description for this access control setting.
Select – Select this option to delete the MAC filter.
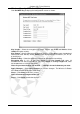
Delete Selected – Click Delete Selected to delete the selected access control setting(s).
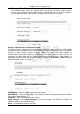
When you click this button, a warning screen displays. Click OK to continue.
Delete All – Click Delete All to remove all access control setting(s). When you click this
button, a warning screen displays. Click OK to continue.
Reset – Click Reset to clear the Select check box(es).
Help – Click Help to display on-line help information in a pop-up screen.