C O N F I G U R A T I O N Endura SM5200 System Manager ® C5619M (8/12)
Contents About the Web Configuration Application . . . . . . . . . . . . . . . . . . . . . . . . . . . . . . . . . . . . . . . . . . . . . . . . . . . . . . . . . . . . . . . . . . . . . . . . . . . . . . . . . . 4 Endura Application Compatibility . . . . . . . . . . . . . . . . . . . . . . . . . . . . . . . . . . . . . . . . . . . . . . . . . . . . . . . . . . . . . . . . . . . . . . . . . . . . . . . . . . . . . 4 Navigating the Web Interface . . . . . . . . . . . . . . . . . . . . . . . . . . . . . . . .
List of Illustrations 1 2 3 4 5 6 7 8 9 10 C5619M (8/12) SM5200 Web Interface . . . . . . . . . . . . . . . . . . . . . . . . . . . . . . . . . . . . . . . . . . . . . . . . . . . . . . . . . . . . . . . . . . . . . . . . . . . . . . . . . . . . . . . . . . . . 4 System Tools. . . . . . . . . . . . . . . . . . . . . . . . . . . . . . . . . . . . . . . . . . . . . . . . . . . . . . . . . . . . . . . . . . . . . . . . . . . . . . . . . . . . . . . . . . . . . . . . . . . . . 5 System Manager Logon . . . . .
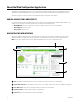
About the Web Configuration Application The SM5200 is a network appliance that serves as the system management component of the Endura® IP video management system. The SM5200 Web Configuration Application allows users to quickly and easily configure the SM5200 without installing additional software. This guide is designed to assist Pelco-certified system administrators with the configuration of the SM5200.
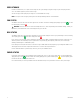
Icons throughout the Web interface will provide you with information about the status of the unit and the validity of your settings. Tooltip: place your mouse pointer over this icon to view additional information about items within the interface Indicates a valid setting or a component operating within a normal, safe range.
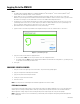
Logging On to the SM5200 NOTES: • The SM5200 Web Configuration Application is compatible with Microsoft® Internet Explorer® versions 9 and later, Mozilla® Firefox® versions 8 and later, and Google Chrome™ versions 16 and later. • Only the admin user can access the SM5200 configuration and video viewing pages. All other users only have access to the Pelco Web Viewer.
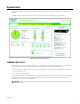
System Status Logging on to the SM5200 as an administrator or clicking the Status tab displays a page detailing the status of the system manager and its components. The SM5200’s status does not update in real time. Click Refresh to gather current status information for your system manager. Figure 4. System Manager Status page TEMPERATURE STATUS The two thermometer icons under Temperature display the core CPU temperature and ambient system temperature of the system manager.
VIDEO STORAGE From the Pelco Web Viewer, users export recorded footage onto the system manager’s integrated storage array for safekeeping and future access. The SM5200 supports up to 12 TB of video storage. The video storage pie chart displays the percentages of used and available video storage. NOTE: Users may free Video Storage by deleting videos from the Export Manager tab in the Pelco Web Viewer. FAN STATUS The SM5200 contains five fans. Each fan’s status appears under Fan Status.
IP Settings Clicking the IP Settings tab displays settings relating to the configuration of your unit’s network interfaces and the failover cluster. The SM5200 comes equipped with two network interfaces, allowing the unit to act as a gateway to the Endura network. The Primary network interface: Connects to your private Endura network. This is the interface over which most optional system manager services operate. You must configure the primary network interface.
CONFIGURING THE SECONDARY NETWORK INTERFACE 1. Navigate to the IP Settings page. 2. Click the box labeled Use Secondary Network Interface 3. Type the IP address, netmask, and gateway in the appropriate fields. 4. Click Save.
System Manager Failover Cluster The Failover Cluster option allows a user to designate a redundant, secondary SM5200 to take over Endura system management duties if the primary SM5200 fails. The secondary SM5200 duplicates data and settings on the primary unit. When the primary unit fails, the secondary immediately takes over system manager duties becoming the new primary system manager, which prevents any interruptions in camera accessibility and recorded footage.
System Settings Click the System tab to display settings governing date, time, access to the Pelco Web Viewer, and SNMP operation. Figure 6. System Page DATE AND TIME CONFIGURATION The SM5200 acts as a Network Time server (NTP) for the private Endura network. Date and Time Configuration contains date and time settings affecting both the system manager and all devices on the Endura network.
USING THE SYSTEM MANAGER AS AN INDEPENDENT TIME SERVER 1. Navigate to the System page 2. Select the “Use the System Manager as an independent time server” option. 3. Enter the current date. 4. Enter the current time. 5. Select your Time zone from the drop down menu. 6. Click Save. SYNCHRONIZING WITH AN EXTERNAL TIME SERVER 1. Navigate to the System page. 2. Select the “Sync date and time with an external time server” option. 3.
PELCO WEB VIEWER CONFIGURATION The Pelco Web Viewer enables users with appropriate permissions to view, search, save, and download video clips from cameras on the Endura network without installing software. Users can simultaneously access up to 16 live video feeds, at or below the bandwidth limit established by settings under Pelco Web Viewer Configuration.
8. Select Remote Access under Services . Figure 7. Select System Permissions 9. Click OK. Users assigned this role can now log on to the Pelco Web Viewer. WEB SERVER PORT CONFIGURATION The SM5200’s Web services only accept connections over HTTPS. For added security, administrators can determine the port on which users can establish a secure communication with the SM5200’s Web interface.
SNMP CONFIGURATION The SM5200 supports SNMP v2c and v3 communications. You can gather status information about your system manager by issuing GET requests or configuring the unit to send traps to a trap manager. CONFIGURING SNMP V2C 1. Navigate to the System page. 2. Select Enable SNMP 3. Select SNMP v2c. 4. Type the community string used to issue GET requests to the system manager in the Community String field. 5. Type the IP Address or hostname of the trap manager in the Address field under Trap Manager.
DHCP Setup In the DHCP tab, you can configure your system manager as a DHCP server for the Endura network. Click the DHCP tab to manage the unit’s DHCP settings. NOTES: • The system manager will only act as a DHCP server on the primary network interface. • Each DHCP scope must have its own unique name. If you have migrated settings from an SM5000, any DHCP scopes with no name or the same name as another scope are automatically renamed the GUID of the scope. Figure 8.
CONFIGURING DHCP SCOPES 1. Navigate to the DHCP page. 2. Select the scope you want to edit. If you need to create a new DHCP scope, click Add Scope. 3. Type a label for the scope in the Scope Name box. 4. Type the scope’s initial IP address in the Starting IP Address field. The Starting IP Address is included in the scope. 5. Type the scope’s final IP address in the Ending IP Address field. The Ending IP Address is included in the scope. 6. Type the netmask, subnet, and gateway in the appropriate boxes. 7.
DELETING MAC ADDRESS RESERVATIONS 1. Navigate to the DHCP page. 2. Select the scope on which you want to delete MAC address reservations. 3. Click MAC Address Reservations. 4. Select the address or addresses you want to delete. If you want to delete all MAC address reservations, click Select All. 5. Click Delete Reservation.
LDAP Setup The system manager can connect to and validate user credentials from an Lightweight Directory Access Protocol (LDAP) server allowing for the integration of the Endura network with single sign-on services. The system manager supports LDAP for Microsoft Active Directory. The system manager supports the two most common methods for LDAP authentication: simple (single bind) and two-stage bind with a service account.
DISABLING PASSWORD EXPIRATION You must disable password expiration before enabling LDAP to prevent user management conflicts between the system manager and the LDAP server. 1. Log on to the WS5200 application as an administrator. 2. Click the System Configuration tab if it is not already selected. 3. Scroll down to Password Settings, and click Off. 4. Click Apply. You can now configure LDAP authentication. CONFIGURING LDAP AUTHENTICATION 1. Navigate to the LDAP page. 2. Select Enable LDAP 3.
Updating the SM5200 Updates for the SM5200 are applied through the WS5200 application or Endura Utilities; you cannot apply an update using the Web configuration application. NOTE: Applying a software update will cause the unit to restart. Do not update the system manager unless you have planned or scheduled system maintenance. If you have two SM5200 units in a failover configuration, the update process automatically accounts for both primary and secondary system managers.
PRODUCT WARRANTY AND RETURN INFORMATION WARRANTY Pelco will repair or replace, without charge, any merchandise proved defective in material or workmanship for a period of one year after the date of shipment.
www.pelco.