
Installation Manual
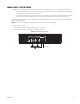
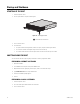

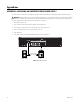

Table Of Contents
C4687M-C (7/13) 29
APPENDIX B: MIGRATING DATA FROM AN SM5000
For a quick and seamless transition to a new system manager, you can transfer data and settings from your existing SM5000 to a new SM5200.
NOTES:
• You must configure the network interface and DHCP settings on the SM5200 to match the settings from the SM5000 before performing
the migration process, or you will lose these settings in the migration process.
• Data migration requires a flash drive with an empty boot record and a Windows-based client on the Endura network. It is recommended
that you use the Pelco flash drive included with your SM5200 for data migration.
• Data migration requires Endura Utilities version 2.3.3 or later. You can download the current version from www.Pelco.com.
• Data migration does not include primary network interface settings or settings for features new and specific to the SM5200. You must
manually configure these settings.
• Do not replace your existing system manager until your new SM5200 is fully configured. Refer to the SM5200 System Manager
Configuration manual for help configuring your SM5200.
• Only the admin user can log on to the SM5200. If the admin user exists before migration, the user will log on to the SM5200 using the
existing account password. If this admin user does not exist before migration, the admin user will log on using the default password.
To transfer Endura data and settings from a SM5000 to a SM5200:
1. Connect your Pelco Flash Drive to a Windows-based client on the Endura network.
2. Open Endura utilities.
3. Right-click SM5000 in the System Attributes tab.
4. Select SM Backup.
5. Select the flash drive as the backup location and click OK. This creates a folder on the flash drive with the name of the IP address of the
SM5000 containing the UtilitiesBackup.tgz file.
6. Copy the UtilitiesBackup.tgz file to the root directory of the flash drive.
7. Remove the flash drive from the client computer and connect it to the SM5200.
8. Turn on the SM5200. After a short boot process, the four lights on the right side of the unit’s front panel (unit status, network port 1,
network port 2, and software status) turn solid amber, indicating that the system is importing the UtilitiesBackup.tgz file. This process might
take several minutes.
9. Remove the flash drive when the software status light turns off, indicating that the migration process is complete. The SM5200 restarts
30 seconds after the migration process has completed. Remove the flash drive within 30 seconds of the completed migration process, or
once the unit has fully rebooted; do not remove the flash drive during the boot process.
NOTE: Upon completing the data migration process, the SM5200 creates a file called .sm5000-migrated in the root directory of the flash drive,
preventing the SM5200 from attempting to import the UtilitiesBackup.tgz file multiple times. If data fails to migrate or you want to reuse the
flash drive to transfer data to another SM5200, delete the .sm5000-migrated file from the flash drive.
Data migration is complete. Upon restarting, configure the network interfaces and other settings specific to the SM5200. Refer to the SM5200
System Manager Configuration manual for additional information.