
Installation Manual
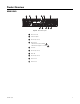
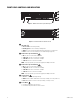

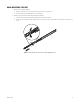
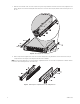
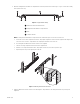
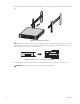
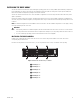
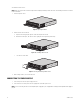
Table Of Contents

20 C4687M-C (7/13)
To install the hard drive carriers:
NOTE: Make sure you protect the unit and its components from improper handling and ESD. Refer to the Safe Handling of Hard Drives document
for more information.
1. Unlock and open the bezel.
Figure 15. Opening the Bezel
2. Install each drive carrier as follows:
a. Open the drive latch (grasp the right side of the latch and pull it to the left).
b. With the drive latch open, slide the drive carrier gently into the designated bay until it stops.
Figure 16. Installing a Drive Carrier
c. Close the drive carrier latch.
Figure 17. Closing and Locking a Drive Carrier
3. After inserting all drives, close and lock the bezel.
CONNECTING THE POWER SUPPLY
1. Connect the power cord to the power supply connector.
2. Connect the other end of the power cord to the appropriate 110/220 VAC power source.
NOTE: If you are connecting the unit to a uninterruptable power supply (UPS), refer to Appendix A: Installing an Uninterruptible Power Supply on
page 28.