
Installation Manual

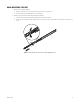
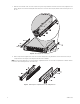
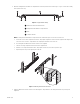
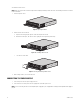
Table Of Contents

16 C4687M-C (7/13)
3. Attach the chassis brackets to the sides of the unit (refer to Figure 8) using four M4 x 6L-H2.5 round head nickel screws (supplied) for each
bracket. Align the chassis brackets starting with the threaded hole closest to the unit’s front panel, with the slotted ends facing the rear of
the unit.
Figure 8. Attaching the Chassis Brackets
4. Attach L-shaped brackets (supplied) to the front and rear of both sliding brackets using two M4 x 6L-H2.5 round head nickel screws per
L-shaped bracket. Leave all eight screws untightened until later in the installation.
NOTE: You can insert the optional 4.2 x 11 x 0.8 nickel washers (supplied) between the screws and the L-shaped brackets to allow the brackets
to slide easier when attaching them to the rack in later steps.
Figure 9. Attaching the L-Shaped Brackets to the Sliding Brackets