® BRIG HT CON TRAS T PMM2001 Monitor Installation/Operation Manual C935M (2/97) Pelco • 3500 Way, Clovis, CA 93612-5699 • USA • (800) 289-9100 or (1-559) 292-1981 FAX (800) 289-9150 or (1-559) 292-3827 • DataFAX (800) 289-9108 or (1-559) 292-0435 International Customers call (1-559) 292-1981 or FAX (1-559) 348-1120
CONTENTS Section Page 1.0 GENERAL .................................................................................................. 1 1.1 IMPORTANT SAFEGUARDS ............................................................ 1 1.2 UNPACKING INSTRUCTIONS .......................................................... 3 1.3 RECOMMENDED TOOLS ................................................................. 3 2.0 DESCRIPTION ..........................................................................................
1.0 GENERAL 1.1 IMPORTANT SAFEGUARDS Before installing your equipment, please read the following important safeguards as outlined by Underwriters Laboratories Inc. Read Instructions All the safety and operating instructions should be read before the appliance is operated. Retain Instructions The safety and operating instructions should be retained for future reference. Heed Warnings All warnings on the appliance and in the operating instructions should be followed.
Power-Cord Protection Power-supply cords should be routed so that they are not likely to be walked on or pinched by items placed upon or against them, paying particular attention to cords at plugs, convenience receptacles, and the point where they exit from the appliance. Overloading Do no overload wall outlets and extension cords as this can result in a risk of fire or electric shock.
1.2 UNPACKING INSTRUCTIONS Unpack and inspect all parts carefully. The following items are supplied: 1 1 1 Monitor Power cord Installation/Operation Manual (C935M) Be sure to save the shipping carton and any inserts. They are the safest material in which to make future shipments. If an item appears to have been damaged in shipment, replace it properly in its carton and contact the factory at 1-800-289-9100 or 1-559-292-1981 for a replacement.
2.0 DESCRIPTION The PMM2001 is a high resolution, black and white, CCTV video monitor. The cabinet is made of steel for ruggedness and, with the exception of the picture tube, the circuitry is all solid-state for reliability. 2.1 MODELS 4 PMM2001 Black and white monitor, 20-inch (50.80 cm) picture display, 120 VAC, EIA standard. (CSA) PMM2001-X Black and white monitor, 20-inch (50.80 cm) picture display, 230 VAC, CCIR standard.
3.0 INSTALLATION 3.1 SURFACE MOUNT The monitor has rubber feet and may be placed on any horizontal surface, such as a desk or table. 3.2 CONNECTIONS 3.2.1 Single-Monitor Installation Refer to Figure 1 and Table A for the following instructions. 1. Connect a 75-ohm video cable from the video source, such as a camera, to the BNC connector labeled INPUT A on the back of the monitor. 2. Plug one end of the power cord into the back of the monitor and plug the other end into a power outlet.
3.2.2 Multiple-Monitor Installation Refer to Figure 2 and Table A for the following instructions. NOTE: In multiple-monitor instal- lations, a maximum of three monitors can be connected together. 1. Connect a 75-ohm video cable from the video source, such as a camera, to the BNC connector labeled INPUT A on the back of the first monitor. 2. Connect a 75-ohm video cable from the OUTPUT A connector on the back of the first monitor to the INPUT A connector on the second monitor. 3.
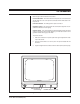
4.0 OPERATION Refer to Figure 3 for the locations of the controls. Power On/Off Switch - This rocker switch turns the power on or off. Push the side with the white line to turn on the power. Push the side with the white circle to turn the power off. LED Power Indicator - The LED lights when power is turned on. Brightness Control - This control adjusts the overall picture brightness to compensate for differences in room lighting.
5.0 MAINTENANCE The only maintenance required is to periodically clean the cabinet and screen. Use a damp cloth to clean the screen. Use mild soap and water to clean the cabinet. Some common household aerosol sprays, cleaning agents, solvents, or polishes may damage the cabinet finish. Dry the cabinet with a soft cloth.
6.
7.0 WARRANTY AND RETURN INFORMATION WARRANTY Pelco will repair or replace, without charge, any merchandise proved defective in material or workmanship for a period of one year after the date of shipment. Exceptions to this warranty are as noted below: • Five years on FT/FR8000 Series fiber optic products. • Three years on Genex® Series products (multiplexers, server, and keyboard).