
Manual


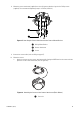
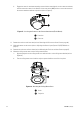
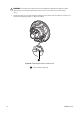
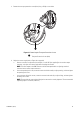
Table Of Contents

36 C3473M-C (10/10)
b. Engage the camera’s attachment mounting screws with the mounting holes on the camera attachment,
and then rotate the camera in the direction of the arrow to the LOCK position to secure the camera to
the camera attachment without any backlash (refer to Figure 27).
Figure 27. Securing the Camera to the Camera Attachment (Flush Mount)
11. Remove the enclosure and inner dome (refer to Removing the Enclosure and Inner Dome on page 36).
12. Make adjustments to the camera (refer to Adjusting the Camera: Super Dynamic 5 (SD5)™ Models on
page 37).
13. Reattach the enclosure and inner dome (refer to Mounting the Enclosure and Inner Dome on page 45).
14. Mount the ceiling mount cover onto the ceiling mount bracket.
a. Align the projection on the ceiling mount cover with the hooks on the ceiling mount bracket (refer to
Figure 28).
b. Turn the ceiling mount cover clockwise and press upward until the cover clicks into place.
Figure 28. Attaching the Ceiling Mount Cover
ì
Protrusion
î
Enclosure
ì
Hooks
î
Projection
LOCK
OPEN