
Manual
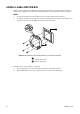
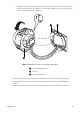
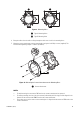
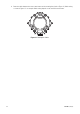
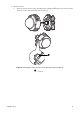
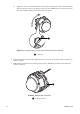

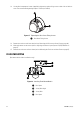
Table Of Contents

C3473M-C (10/10) 25
Figure 9. Mounting Holes
4. Bring the cables from the wall or ceiling through the cable access hole in the mounting base.
5. Mount the camera attachment onto the mounting base using the four Phillips screws (supplied). The
recommended tightening torque is 0.78 N·m (0.58 lbf·ft).
Figure 10. Mounting the Camera Attachment to the Mounting Base
NOTES:
• For wall mounting, be sure that the TOP mark on the camera attachment faces upward.
• For ceiling mounting, the front side of the camera (indicated by the Pelco logo) shall be aligned in the
direction of the arrow and the FRONT mark on the camera attachment.
• Ensure that any one of the arrows on the mounting base is aligned with the arrow and TOP mark on the
camera attachment.
ì
Type A Mounting Holes
î
Type B Mounting Holes
ì
Camera Attachment
FRONT
TOP