
Manual
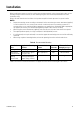
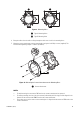
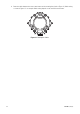
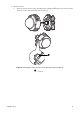
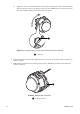

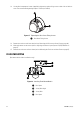
Table Of Contents

C3473M-C (10/10) 21
Installation
When installing the camera on a wall or a ceiling, there are three methods: using a 2-gang junction box, surface
mounting using the surface mount kit, or flush mounting using the flush mount kit (recommended for indoor
installations only).
Refer to all work related to the installation of this product to qualified service personnel or system installer.
NOTES:
• Prepare the mounting screws according to the material of the area where the camera attachment (supplied)
is to be installed. In this case, wood screws and nails should not be used. For mounting a camera on a
concrete ceiling, use an anchor bolt (M4 or appropriate, not supplied) or an AY plug bolt (M4 or appropriate,
not supplied) for securing. The recommended tightening torque is M4: 1.6 N·m (1.18 lbf·ft).
• When using the camera attachment (supplied), make sure that one of the two arrow marks face upward.
• The required pullout capacity of a single screw/bolt is 196 N (44.06 lbf) or more.
• If a ceiling board (such as plaster board) is too weak to support the total weight, the area shall be sufficiently
reinforced.
• When using an optional mounting bracket, refer to the operating instructions of the bracket in use.
*Make sure that the installed mount bracket can support more than five times the weight of the camera.
Table A. Recommended Mounting
Installation
Site
Applicable Mounting
Bracket
Recommended
Screws
Number
of Screws
Minimum Pullout
Strength (per 1 pc.)
Ceiling/wall 2-gang junction box M4 or appropriate 4 pcs 196 N (44.06 lbf)
Ceiling/wall
(surface mount)
Mounting base, approx.
350 g (0.77 lbs)
M4 or appropriate 4 pcs 196 N (44.06 lbf)
Ceiling
(flush mount)
Ceiling mount bracket,
approx. 700 g (1.55 lbs)
——*